


CSPM
- Click 'Settings' < 'Cloud Security Settings'
- Select 'Integration' < 'CSPM'
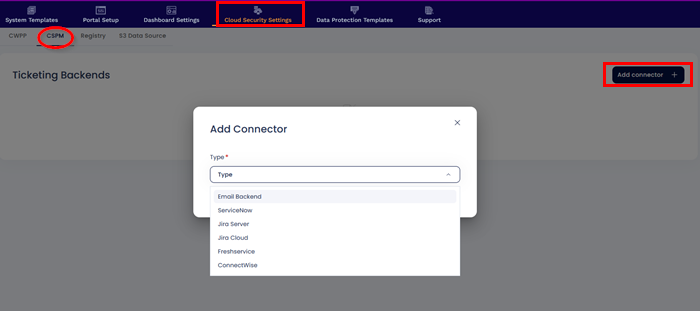
Under the CSPM subsection, we can integrate with various ticketing tools like
The Email Backend Integration allows making use of your own SMTP server to send all Emails that originate from the Xcitium platform.
a. Prerequisites
The Email Backend Integration requires the following credentials of your SMTP server handy:
- SMTP Hostname
- SMTP Port and whether SSL or TLS needs to be used
- Your SMTP mail address and a trusted address which you would like to be the sender(Both can be same)
- The Password of the SMTP account or an App Password
b. Steps to Integrate
- Click Cloud Security Settings > Integrations
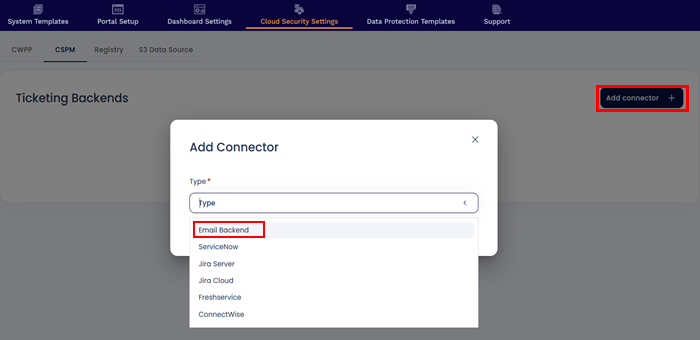
- Click CSPM > Add connector
- Select 'Email Backend' from dropdown
- Enter the following details to configure Email backend Integration.
- Name: Enter the name for the integration. You can set any name. E.g. Secure Email Backend
- Host: The SMTP Hostname. e.g.,smtp.google.com
- Port: The port number to be used for the SMTP server. e.g.,587
- Select to use TLS or SSL based on the port number specified in the Port field
- Username: The email address to authenticate with the SMTP server. e.g.,admin@gmail.com
- From Email: The email address that will be in the Sender field of the emails. e.g.,notify@gmail.com
- Secret: The Password to authenticate with the SMTP server. This could be an App Password
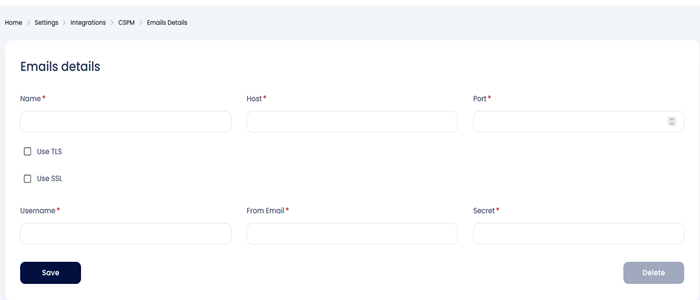
- Click on 'Save'
- The Email Backend has now been configured successfully and all emails originating from the Xcitium platform will henceforth be sent using this SMTP server.
Integrate Xcitium with ServiceNow and receive Xcitium alert notifications in your ServiceNow accounts. With this integration, you can automate the process of generating ServiceNow tickets with your existing security workflow.
To set up this integration, you need to coordinate with your ServiceNow administrator and gather the inputs needed to enable communication between Xcitium and ServiceNow.
a. Prerequisites
- The ServiceNow Integration requires the following: Instance URL, Instance Username and Instance Password.
- Please refer to the ServiceNow documentation for how to create an instance and obtain the required credentials.
b. Steps to Integrate
- Click Cloud Security Settings > Integrations
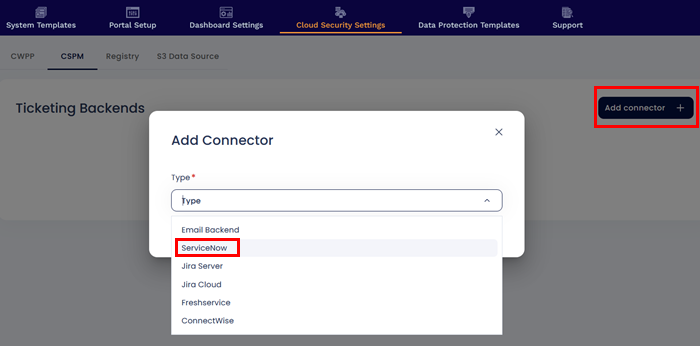
- Click CSPM > Add connector
- Select ServiceNow from dropdown
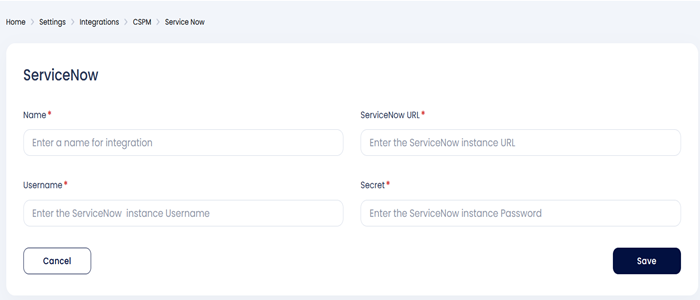
- Enter the following details to configure ServiceNow Integration.
- Integration Name: Enter the name for the integration. You can set any name. E.g. MyServiceNow
- ServiceNow Instance URL: The URL of the ServiceNow instance. e.g., https://my-instance.service-now.com
- Instance Username: The Username associated with the instance. e.g., admin
- Secret: The current password of the instance. e.g., SNxxxxxxxxxxxxx39
- Click on the ServiceNow ticketing backend
- Click on Add Configuration and enter the following details:
- Configuration name: this name will be displayed under ticket configuration while creating tickets.
- Default template: to specify the of data that this configuration will be used for making tickets.
- Issue Type: You can choose from the dropdown.
- Fill the priority mapping according to your choice.
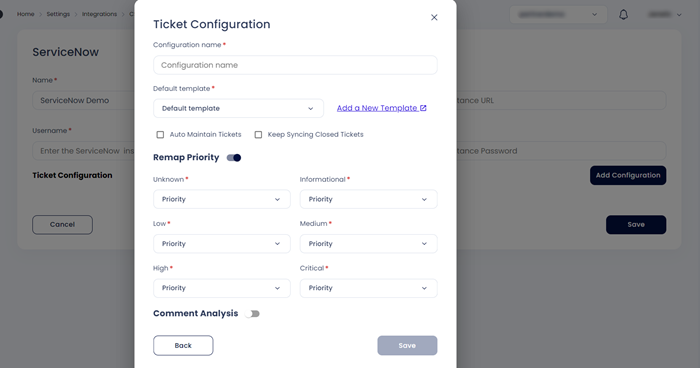
- Click on 'Save'
- The ServiceNow Backend has now been configured successfully.
Integrate Xcitium with Jira and receive Xcitium alert notifications in your Jira accounts. With this integration, you can automate the process of generating Jira tickets with your existing security workflow.
To set up this integration, you need to coordinate with your Jira administrator and gather the inputs needed to enable communication between Xcitium and Jira.
a. Prerequisites
- You need a Jira Site URL, Email, UserID & API token, Project key for this integration.
- To create a JIRA token, go to https://id.atlassian.com/manage-profile/security/api-tokens, and click on create an API token.
b. Steps to Integrate
- Click Cloud Security Settings > Integrations
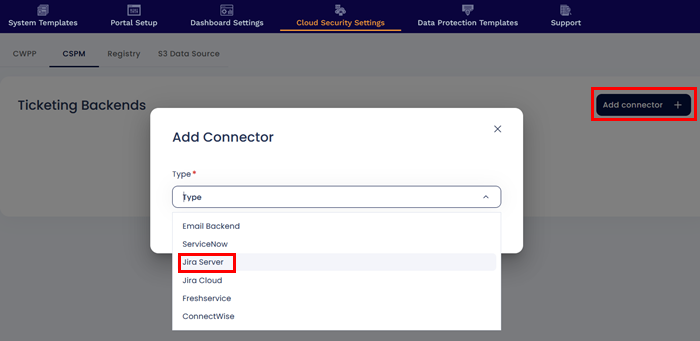
- Click CSPM > Add connector
- Select Jira Cloud from dropdown

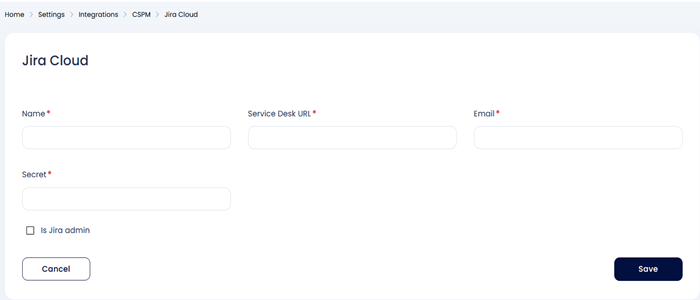
- Enter the following details to configure JIRA.
- Integration Name: Enter the name for the integration. You can set any name. e.g.,Test JIRA
- Service desk URL: Enter the site name of your organisation. e.g., https://jiratest.atlassian.net/
- User Email: Enter your Jira account email address here.e.g., jira@organisation.com
- Secret: Enter the generated Token here from https://id.atlassian.com/manage-profile/security/api-tokens. .e.g., kRVxxxxxxxxxxxxx39
Click on the Jira ticketing backend to add configuration.
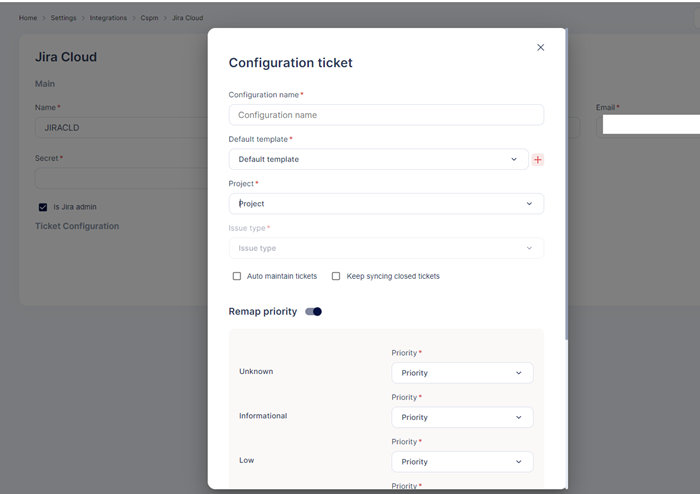
Here Enter the following details:
- Configuration name: this name will be displayed under ticket configuration while creating tickets.
- Default template: to specify the of data that this configuration will be used for making tickets.
- Project name: From the list of project select the project where you want your tickets to be created.
- Issue Type: You can choose from the dropdown.
- Fill the priority mapping according to your choice and press save.
Integrate Xcitium with Jira and receive Xcitium alert notifications in your Jira accounts. With this integration, you can automate the process of generating Jira tickets with your existing security workflow.
To set up this integration, you need to coordinate with your Jira administrator and gather the inputs needed to enable communication between Xcitium and Jira.
a. Prerequisites
- You need a Jira Site URL, Email, UserID & API token, Project key for this integration.
- To create a JIRA token, go to https://id.atlassian.com/manage-profile/security/api-tokens, and click on create an API token.
b. Steps to Integrate
- Click Cloud Security Settings > Integrations
- Click CSPM > Add connector
- Select Jira Server from dropdown
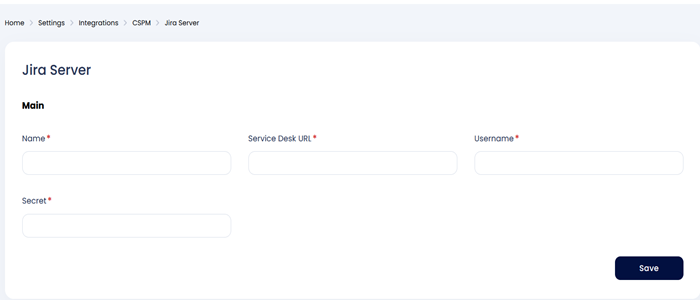
- Enter the following details to configure JIRA.
- Integration Name: Enter the name for the integration. You can set any name. e.g.,Test JIRA
- Service desk URL: Enter the site name of your organisation. e.g., https://jiratest.atlassian.net/
- Username: Enter your Jira account email address here.e.g., jira@organisation.com
- Secret: Enter the generated Token here from https://id.atlassian.com/manage-profile/security/api-tokens. .e.g., kRVxxxxxxxxxxxxx39
- Click on the Jira ticketing backend to add configuration.
Here Enter the following details:
- Configuration name: this name will be displayed under ticket configuration while creating tickets.
- Default template: to specify the of data that this configuration will be used for making tickets.
- Project name: From the list of project select the project where you want your tickets to be created.
- Issue Type: You can choose from the dropdown.
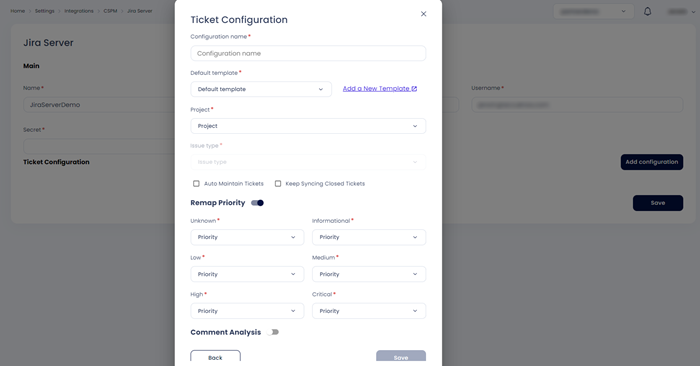
Fill the priority mapping according to your choice and press save.
Integrate Xcitium with Freshservice and receive Xcitium alert notifications in your Freshservice accounts. With this integration, you can automate the process of generating Freshservice “Problem alerts“ with your existing security workflow.
To set up this integration, you need to coordinate with your Freshservice administrator and gather the inputs needed to enable communication between Xcitium and Freshservice.
a. Prerequisites
- You need a Company domain , Email & API key (secret) for this integration.
- You can find your API key in profile settings in the right-side column.
b. Steps to Integrate
- Click Cloud Security Settings > Integrations
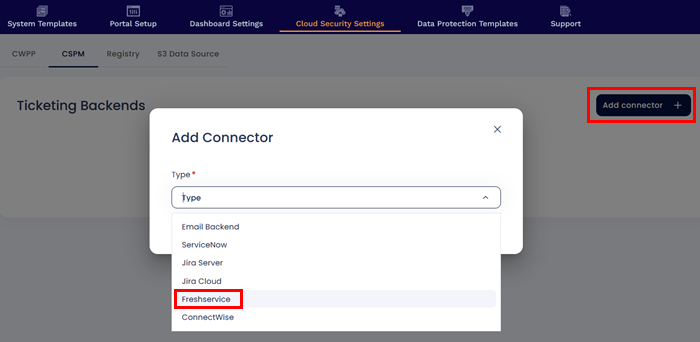
- Click CSPM > Add connector
- Select Freshservice from dropdown
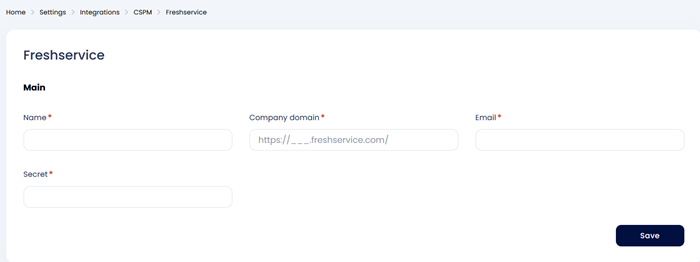
- Enter the following details to configure Freshservice:
- Integration Name: Enter the name for the integration. You can set any name. e.g.,TestFreshservice
- Domain Name: Enter the site name of your organization as shown in your URL. e.g., for https://xcitiumxample.freshservice.com/ enter the domain name as xcitiumexample.
- User Email: Enter your Freshservice account email address here. e.g., freshservice@organisation.com
- Secret: Enter the API key Here. This can be found in profile settings.
- Click Save to save the Integration.
Click on the Freshservice ticketing backend to add configuration.
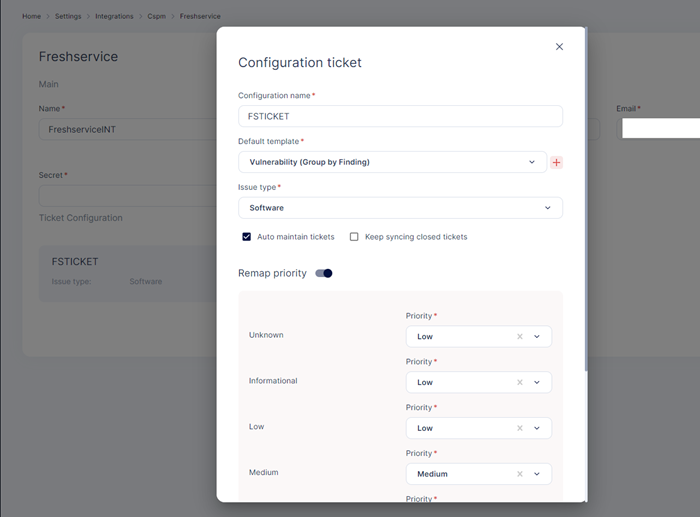
Here Enter the following details:
- Configuration name: this name will be displayed under ticket configuration while creating tickets.
- Default template: to specify the of data that this configuration will be used for making tickets.
- Issue Type: You can choose from the dropdown.
- Fill the priority mapping according to your choice and press save.
Integrate Xcitium with Connectwise and receive Xcitium alert notifications in your Connectwise account. With this integration, you can automate the process of generating Connectwise tickets with your existing security workflow.
To set up this integration, you need to coordinate with your Connectwise administrator and gather the inputs needed to enable communication between Xcitium and Connectwise.
a. Prerequisites
- You need a Service Desk URL, Company Id, Public key, Private key & Client Id for this integration.
- Go to this link: https://developer.connectwise.com/ClientID and fill in the form to receive your client id.
- To get public and private keys go to your Connectwise manage page → system → members → API keys and create new API keys , here you will receive a public and private key.
b. Steps to Integrate:
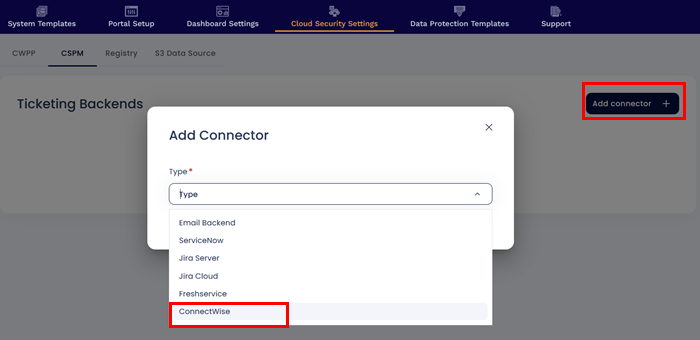
- Click Cloud Security Settings > Integrations
- Click CSPM > Add connector
- Select ‘Connectwise’ from dropdown
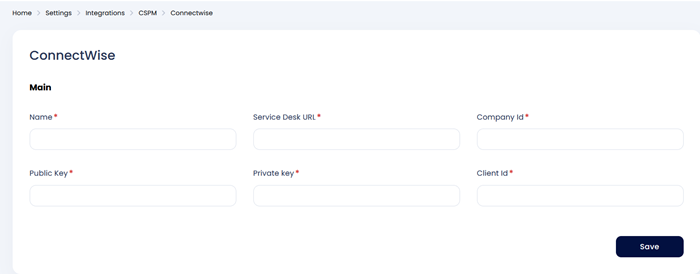
- Enter the following details to configure Connectwise.
- Integration Name: Enter the name for the integration. You can set any name. e.g.,Testconnectwise
- Service Desk URL: Enter the URL of your Connectwise manage website. e.g., for https://staging.connectwisedev.com/CD019.... enter the url as https://staging.connectwisedev.com/
- Company Id: Enter your Connectwise Company Id here. e.g., Connectwise_1
- Public key and Private key: Generate a public and private key by going to system → members → API keys and put the values respectively.
- Client Id: To receive your client Id go to this link: https://developer.connectwise.com/ClientID and fill the form for Client Id.
- Click Save to save the Integration.
Click on the Connectwise ticketing backend to add configuration.
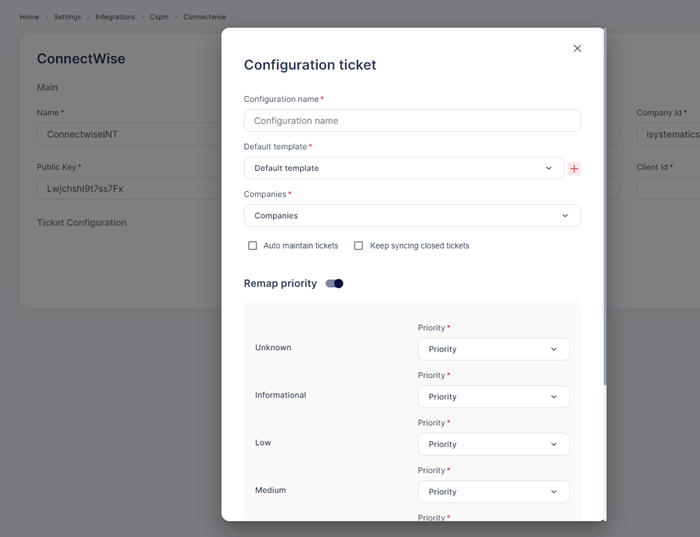
Here Enter the following details:
- Configuration name: this name will be displayed under ticket configuration while creating tickets.
- Default template: to specify the of data that this configuration will be used for making tickets.
- Companies: From the list of companies choose the company where you want to receive tickets.
- Issue Type: You can choose from the dropdown.
Fill the priority mapping according to your choice and press save.