Manage your Licenses
-
Click 'License Management' > 'License Management'
-
This area lets you add, delete and renew licenses, view license details, change license allocation, configure reports, and more.
See the following for more help:

|
Column |
Description |
|---|---|
|
Allocation Type |
States whether you can use the license for multiple customers or a single customer. Note: This applies only for Xcitium products for Managed Service Provider (MSP) customers. Licenses purchased by Xcitium Enterprise customers can be used only for their organization, that is single customer.
|
|
License Key |
Unique identifier for the license. |
|
License Configuration |
The security features which are included on the license. |
|
Seats |
Number of devices covered by the license.
|
|
Allocated |
The number of seats that you have already assigned to devices. Seats can be assigned to a single customer or multiple customers. |
|
Free |
Number of seats remaining on the license. |
|
Days to Expiration |
Number of days left on the license. |
|
Expires |
License period end date and time |
|
License Type |
Indicates whether the subscription is free, premium or managed. |
-
Click column headers to sort items in ascending or descending order
-
You can enter license keys in the search box to locate specific licenses.
-
Click the funnel at top-right to open more filters:
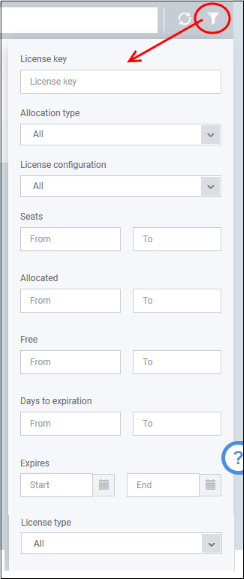
You can purchase new licenses
from Xcitium Account Manager (XAM) at https://accounts.Xcitium.com.
-
Log in at https://accounts.Xcitium.com with your Xcitium Enterprise username and password
-
Select 'Advanced Endpoint Protection (AEP)' and complete the purchase process.
Your license
key will be sent to your registered email address.
Register the license
Once you have obtained a new license, you need to register it in Xcitium Enterprise.
-
Click 'License Management' > 'License Management'
-
Open the 'Licenses' tab
-
Click 'Add New License' at the top left.

-
Enter the license key from your confirmation email.
-
Click 'Add'.
Your new license is shown in the 'License Key' column.
-
Click 'License Management' > 'License Management'
-
Open the 'Licenses' tab
-
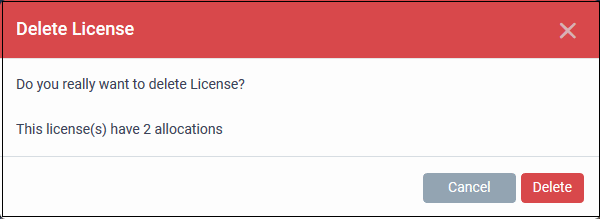
Select the license and click 'Delete License' at the top
-
Click 'Delete' to remove the license from the list.
Note - You can add the license again if required. See above how to add a license.
-
Click 'License Management' > 'License Management'
-
Open the 'Licenses' tab
-
Select the license and click 'Details' at the top.
The license details screen opens:
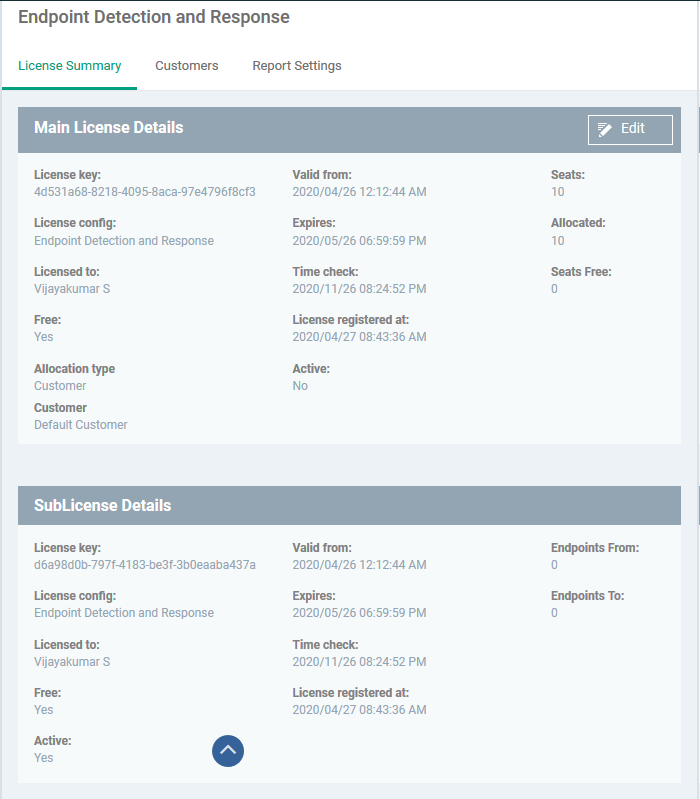
The license details screen has three tabs:
-
License Summary - Details of your subscriptions for Xcitium Enterprise and other Xcitium products. You can change the license allocation type from here too.
-
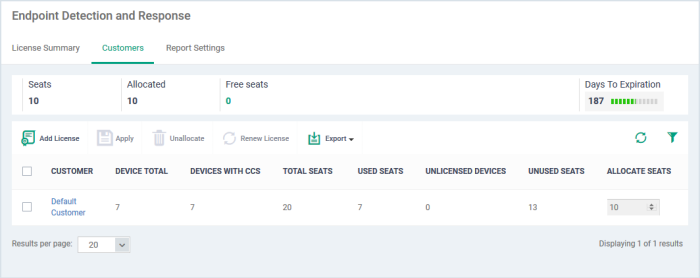
Customers - Shows how your license seats are allocated among your customers. Applies only to Xcitium Products for MSP customers. Licenses purchased by Xcitium Enterprise customers are automatically allocated only to their organization.
-
Report Settings - Configure license usage reports.
-
Main License Details - Info about your Xcitium Enterprise subscriptions.
-
Sub License Details - Info about additional subscriptions included with the main license. These licenses are for other Xcitium products such as Valkyrie.
Change License Allocation Type –Applies only to Xcitium products for MSP customers. Xcitium Enterprise customers should leave the setting as 'Allocated'.
The customers area shows how your seats are distributed.
|
Column Heading |
Description |
|---|---|
|
Customer |
Name of the customer. By default, it is your company.
|
|
Device Total |
Number of endpoints you have assigned.. |
|
Device with CCS |
Number of endpoints which have Xcitium Client Security (XCS) installed |
|
Total Seats |
Number of seats available on all licenses. |
|
Used Seats |
Number of seats currently assigned. |
|
Unlicensed Devices |
Number of devices enrolled for the customer and have CCS installed, exceeding the total number of seats allotted. |
|
Unused Seats |
Number of seats remaining on the license
|
|
Allocate Seats |
Add or remove seats |
|
Controls |
|
Export the seat distribution report for a license
-
Click 'License Management' > 'License Management'
-
Open the 'Licenses' tab
-
Select the license and click 'Details' at the top
-
Click the 'Customers' tab
-
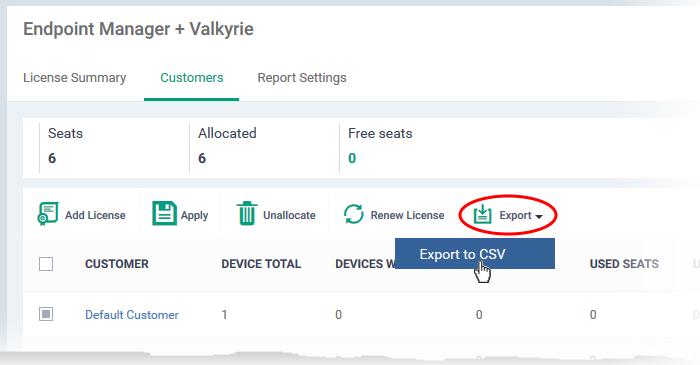
Click the 'Export' button above the table then choose 'Export to CSV':
-
The CSV file will be available in 'Dashboard' > 'Reports'
-
See Reports in The Dashboard for more details.
Configure Usage Report Settings
The report contains details on the license period, allocation type, seats covered by the license, total devices used, and so on.
-
Click 'License Management' > 'License Management'
-
Open the 'Licenses' tab
-
Select the license and click 'Details' at the top
-
Open the 'Report Settings' tab and click 'Edit' at top-right
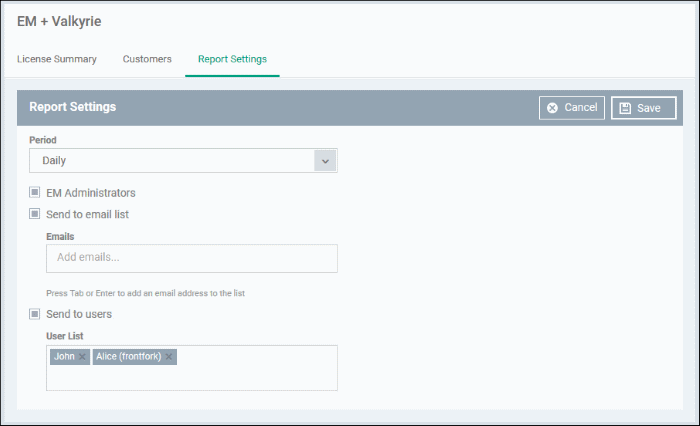
Period - How frequently the report is generated.
EM Administrators - Send the report to users with the admin role
Send to email list - Add the mail addresses of people to whom the report should be sent.
Enter an email address then press 'Enter'. Repeat the process to add more addresses.
Send to users - Add enrolled users to whom the report should be sent.
Enter the first few letters of a username then select from the suggestions.
-
Click 'Save'
-
Click 'License Management' > 'License Management'
-
Open the 'Licenses' tab
-
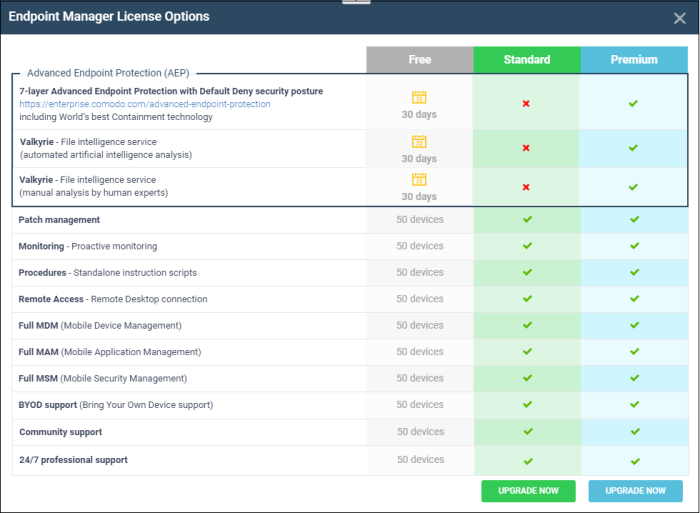
Select the license and click 'Renew License' at the top

The 'License Options' screen shows a comparison of available license types:
-
Click 'Upgrade Now' under the license type you want.
You will be taken to the order forms to complete the purchase.
-
Click 'License Management' > 'License Management'
-
Open the 'Licenses' tab
-
Click the funnel icon
 to filter which records are included in the report.
-
Click the 'Export' button above the table then choose 'Export to CSV':

-
The CSV file will be available in 'Dashboard' > 'Reports'
-
See Reports in The Dashboard for more details.


