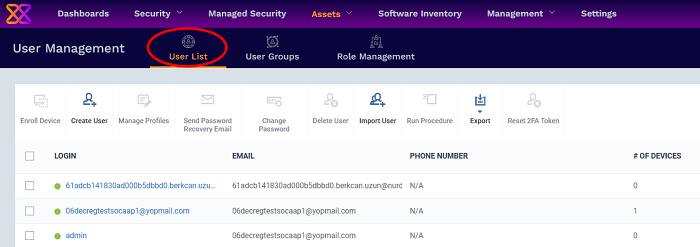
Manage Users
Click 'Assets' > 'User Management' > 'User List'
-
You can enroll users to Xcitium Enterprise and assign them roles with different privilege levels (as 'administrators', 'technicians', 'users', or a custom role).
-
Devices belonging to users can only be enrolled after adding them to Xcitium.
-
Users can be added using any of the following methods:
- Manually add user accounts
- Import users from a comma separated values (.csv) file
- Bulk enroll users and Windows endpoints from Active Directory (AD)
-
The 'User List' shows all user accounts that have been added to Xcitium. Admins can add/manage users, enroll user devices, manage device configuration profiles and more.
-
Click 'Assets' > 'User Management' > 'User List'

|
Column Heading |
Description |
|---|---|
|
Name |
The login username of the user.
|
|
|
The registered email address of the user. Account activation and device enrollment mails are sent to this address. |
|
Phone Number |
The registered phone number of the user. |
|
# of Devices |
The total number of devices enrolled for the user. |
|
2FA Status |
Indicates whether two-factor authentication (2FA) is enabled or not for the user.
|
|
Last Login |
Date and time that the user most recently accessed Xcitium. |
|
Controls |
|
|
Enroll Device |
Add user devices for management by Xcitium. You can enroll Android, iOS, Mac, Windows and Linux devices. See Enroll User Devices for Management for more details. |
|
Create User |
Manually add user accounts to Xcitium.
|
|
Manage Profiles |
A profile determines the security configuration and network access rights of a device. See Assign Configuration Profile(s) to a User's Devices for more details. |
|
Send Password Recovery Email |
Reset the password of users who have admin privileges. The password allows them to login to the Xcitium console. See Send password recovery emails for users for more details. |
|
Change Password |
Generate new password for a user. See Generate New Password for a User for more details. |
|
Delete User |
Terminate selected user accounts. See Remove a User for more details. |
|
Import User |
Add new users by importing them from a comma separated values (CSV) file. See Import Users from a CSV File for more help. |
|
Export |
Save a copy of the current user list as a comma separated values (CSV) file. The exported .csv is available in 'Dashboards' > 'Dashboards' > 'Reports' See Export the List of Users for more details. |
|
Reset 2FA Token |
Force users to configure new two-factor authentication codes. See Reset Two Factor Authentication Token for a User for more details. |
|
Run Procedure |
Execute stand-alone instruction scripts and patches on managed devices. See Run Procedures on User Devices for more help with this. |
-
Click any column header to sort items in ascending/descending order.
-
Click the funnel button
 at the right end to open the filter options.
-
To display all items again, clear all filter fields and click 'OK'.
-
By default, 20 search results are shown per page. Click the arrow next to 'Results per page' to increase the number up to a max of 200.
-
Click 'Assets' > 'User Management' > 'User List'.
-
Click the funnel icon to filter which records are included in the report.
-
Click the 'Export' button above the table then choose 'Export to CSV':

-
The CSV file will be available in 'Dashboards' > 'Reports'.
-
See Reports in The Dashboards for more details.
Please use the following links to find out more:


