Comodo Help
Find the desired product help
Xcitium Enterprise

Xcitium Enterprise

Xcitium Enterprise Administrator Guide

English

Print Help Download Help
Configure Xcitium Enterprise > Xcitium Enterprise Portal Configuration > Import User Groups From LDAP
  • Introduction To Xcitium Enterprise - Endpoint Protection Platform
    • Key Concepts
    • Best Practices
    • Login Into The Admin Console
    • Upgrade To Full Version
  • The Admin Console
  • The Dashboards
  • CNAPP Dashboard
  • ROI Dashboard
  • Devices And Device Groups
    • Manage Device Groups
      • Create Device Groups
      • Edit A Device Group
      • Assign Configuration Profiles To A Device Group
      • Remove A Device Group
      • Run Procedures On Device Groups
    • Manage Devices
      • Add New Devices
      • Manage Windows Devices
        • View And Edit Device Name
        • View Summary Information
        • View Network Information
        • View And Manage Profiles Associated With A Device
        • View Maintenance Windows Associated With A Device
        • View And Manage Applications Installed On A Device
        • View The Files On A Device
        • View Exported Configurations And Import Profiles
        • View MSI Files Installed On A Device Through Xcitium
        • View And Manage Patches For Windows And 3rd Party Applications
        • View Antivirus Scan History
        • View And Manage Device Group Memberships
        • View Device Logs
      • Manage Mac OS Devices
        • View And Edit Mac OS Device Name
        • Summary Information Of Mac Device
        • View Installed Applications
        • View Quarantined Files On Mac OS Device
        • View And Manage Profiles Associated With A Device
        • View Packages Installed On A Device Through Xcitium
        • View And Manage Device Group Memberships
        • View Mac Device Logs
      • Manage Linux Devices
        • View And Edit Linux Device Name
        • Summary Information Of Linux Device
        • View Network Information Of A Linux Device
        • View And Manage Profiles Associated With A Linux Device
        • View Linux Packages Installed On A Device Through Dragon
        • View And Manage Device Group Memberships
      • Manage Android Devices
        • View And Edit Device Name
        • View Summary Information
        • Manage Installed Applications
        • View And Manage Profiles Associated With A Device
        • View Sneak Peek Pictures To Locate Lost Devices
        • View The Location Of The Device
        • View And Manage Device Group Memberships
      • Manage IOS Devices
        • View And Edit Device Name Of An IOS Device
        • View Summary Information Of An IOS Device
        • View Applications Installed On An IOS Device
        • View And Manage Profiles Associated With An IOS Device
        • View The Location Of An IOS Device
        • View And Manage Group Memberships Of An IOS Device
      • View User Information
      • Remote Management Of Windows And Mac OS Devices
        • Transfer Items To / From The Remote Computer
      • Remotely Manage Folders And Files On Windows Devices
      • Manage Processes On Remote Windows Devices
      • Manage Services On Remote Windows Devices
      • Use The Command Prompt On Remote Windows Devices
      • View Event Logs On Remote Windows Devices
      • Apply Procedures To Windows And Mac Devices
      • Remotely Install And Manage Packages On Windows Devices
      • Remotely Install Packages On Mac OS Devices
      • Remotely Install Packages On Linux Devices
      • Send Enrollment Link To IOS Devices
      • Generate An Alarm On Android Devices
      • Remotely Lock Mobile And Mac OS Devices
      • Wipe Selected Mobile And Mac Devices
      • Assign Configuration Profiles To Selected Devices
      • Set / Reset Screen Lock Password For Mobile Devices
      • Update Device Information
      • Send Text Messages To Mobile Devices
      • Restart Selected Windows Devices
      • Change A Device's Owner
      • Change The Ownership Status Of A Device
      • Add Custom Notes And Tags On Devices
      • Remove A Device
      • Generate Device List Report
      • Manage Isolate And Release From Isolation
    • Bulk Enrollment Of Devices
      • Enroll Windows, Mac OS And Linux Devices By Installing The Communication Client
        • Enroll Windows Devices Via AD Group Policy
        • Enroll Windows, Mac OS And Linux Devices By Offline Installation Of Agent
        • Enroll Windows Devices Using Auto Discovery And Deployment Tool
      • Enroll Android And IOS Devices Of AD Users
    • Download And Install The Remote Control Tool
  • Cloud Workloads
  • Cloud Assets
  • Cloud Security
    • View Vulnerabilities Findings
    • Registry Scan
    • CSPM Executive Dashboard
    • Compliance Summary
    • CWPP Dashboard
    • App Behavior
    • Manage Policies
    • Remediation
    • View Alerts
    • Manage Triggers
    • View Reports
  • Users And User Groups
    • Manage Users
      • Create New User Accounts
        • Manually Add Users
        • Import Users From A CSV File
      • Enroll User Devices For Management
        • Enroll Android Devices
        • Enroll IOS Devices
        • Enroll Windows Endpoints
        • Enroll Mac OS Endpoints
        • Enroll Linux OS Endpoints
      • View User Details
        • Update The Details Of A User
      • Assign Configuration Profiles To User Devices
      • Remove A User
      • Generate New Password For A User
      • Reset Two Factor Authentication Token For A User
      • Run Procedures On User Devices
    • Manage User Groups
      • Create A New User Group
      • Edit A User Group
      • Assign Configuration Profiles To A User Group
      • Remove A User Group
      • Run Procedures On User Group Devices
    • Configure Role Based Access Control For Users
      • Create A New Role
      • Manage Permissions And Users Assigned To A Role
      • Remove A Role
      • Manage Roles Assigned To A User
  • Configuration Templates
    • Create Configuration Profiles
      • Profiles For Android Devices
      • Profiles For IOS Devices
      • Profiles For Windows Devices
        • Create Windows Profiles
          • Associated Devices Settings
          • Antivirus Settings
          • Communication Client And Xcitium Client - Security Application Update Settings
          • File Rating Settings
          • Firewall Settings
          • HIPS Settings
          • Containment Settings
          • Maintenance Window Settings
          • VirusScope Settings
          • Xcitium Verdict Cloud
          • Global Proxy Settings
          • Client Proxy Settings
          • Agent Discovery Settings
          • Communication Client And Xcitium Client - Security Application UI Settings
          • Logging Settings
          • Client Access Control
          • External Devices Control Settings
          • Monitors
          • Procedure Settings
          • Remote Control Settings
          • Remote Tools Settings
          • Miscellaneous Settings
          • Script Analysis Settings
          • Data Loss Prevention Settings
          • Patch Management Settings
          • Performance Settings
          • Thumbnails Settings
          • Chat Settings
          • Applications Settings
        • Import Windows Profiles
      • Profiles For Mac OS Devices
        • Create A Mac OS Profile
          • Antivirus Settings For Mac OS Profile
          • Certificate Settings For Mac OS Profile
          • Restrictions Settings For Mac OS Profile
          • VPN Settings For Mac OS Profile
          • Wi-Fi Settings For Mac OS Profile
          • Remote Control Settings For Mac OS Profile
          • External Device Control Settings For Mac OS Profile
          • Valkyrie Settings For MacOS Profile
          • Procedure Settings For Mac Profiles
          • Monitor Settings For Mac OS Profile
      • Profiles For Linux Devices
        • Create A Linux Profile
          • Antivirus Settings For Linux Profile
          • Communication Client And XcitiumClient - Security Application Update Settings For Linux Profile
          • User Interface Settings For Linux Profile
          • Logging Settings For Linux Profile
          • Clients Access Control Settings For Linux Profile
          • Valkyrie Settings For Linux Profile
    • View And Manage Profiles
      • Export And Import Configuration Profiles
      • Clone A Profile
    • Edit Configuration Profiles
    • Manage Default Profiles
    • Manage Alerts
      • Create A New Alert
      • Edit / Delete An Alert
    • Manage Procedures
      • View And Manage Procedures
      • Create A Custom Procedure
      • Combine Procedures To Build Broader Procedures
      • Review / Approve / Decline New Procedures
      • Add A Procedure To A Profile / Procedure Schedules
      • Import / Export / Clone Procedures
      • Change Alert Settings
      • Apply Procedures To Devices
      • Edit / Delete Procedures
      • View Procedure Results
    • Manage Monitors
      • Create Monitors And Add Them To Profiles
        • Monitors For Windows Devices
        • Monitors For Mac OS Devices
      • View And Edit Monitors
    • Data Loss Prevention Rules
      • Create DLP Discovery Rules And Add Them To Profiles
      • View And Edit DLP Discovery Rules
      • Create DLP Monitoring Rules And Add Them To Profiles
      • View And Edit DLP Monitoring Rules
  • Security Systems
    • View Alerts And Security Events
      • View Alerts And Security Events By Time
      • View Alerts And Security Events By Files
      • View Alerts And Security Events By Device
      • Alert Policy
      • Suppression Rule
    • Investigate Events
      • Search Events By Query
      • Search Events By File
      • Search Events By Device
      • View Android Threat History
      • Process Timeline
    • Endpoint Security Status
      • Run Antivirus And/or File Rating Scans On Devices
      • Handle Malware On Scanned Devices
      • Update Virus Signature Database On Windows, Mac OS And Linux Devices
    • View And Manage Blocked Threats
    • View And Manage Quarantined Items
    • View Contained Threats
    • View And Manage Autorun Items
    • Manage File Trust Ratings On Windows Devices
      • File Ratings Explained
    • View List Of File Verdicts
    • View History Of External Device Connection Attempts
    • Data Loss Prevention Scans
      • DLP Logs
      • DLP Quarantined Files
  • Network Management
    • Create And Run Network Discovery Tasks
    • Manage Profiles For Network SNMP Devices
    • Manage Network Devices
      • Manage SNMP Devices
        • SNMP Device Details Interface
      • Discovered Devices
    • Manage Network Monitors
  • Software Inventory
    • View Applications Installed On Android And IOS Devices
      • Blacklist And Whitelist Applications
    • Patch Management
      • Manage OS Patches On Windows Endpoints
      • Install 3rd Party Application Patches On Windows Endpoints
        • Xcitium Supported 3rd Party Applications
    • View And Manage Applications Installed On Windows Devices
      • Uninstall A Windows Application From Selected Devices
      • Uninstall A Windows Application From All Devices
    • Vulnerability Management
  • Management Settings
    • Account Management
    • License Management
      • Manage Your Licenses
      • License Allocations
      • Bill Forecast
  • Configure Xcitium Enterprise
    • Email Notifications, Templates And Custom Variables
      • Configure Email Templates
      • Configure Email Notifications
      • Create And Manage Custom Variables
      • Create And Manage Registry Groups
      • Create And Manage COM Groups
      • Create And Manage File Groups
      • Create And Manage Tags
    • Xcitium Enterprise Portal Configuration
      • Import User Groups From LDAP
      • Configure Portal Settings
      • Configure Communication And Security Client Settings
        • Configure The Xcitium Android Client
          • Configure Android Client General Settings
          • Configure Android Client Antivirus Settings
          • Add Google Cloud Messaging (GCM) Token
        • Add Apple Push Notification Certificate
        • Configure Windows Clients
          • Configure Communication Client Settings
          • Configure Client Security Settings
      • Manage Xcitium Enterprise Extensions
      • Configure Xcitium Enterprise Reports
      • Device Removal Settings
      • Account Security Settings
      • Set-up Administrator's Time Zone And Language
      • Configure Audit Log Settings
    • Dashboard Settings
    • Cloud Security Settings
      • Manage Cloud Accounts
        • Amazon Web Server (AWS) Account Onboarding
        • Google Cloud Platform (GCP) Account Onboarding
        • Microsoft Azure Account Onboarding
      • Manage Cluster
      • Configure Integrations
        • CWPP
        • CSPM
        • Registry
        • S3 Data Source
      • Create And Manage Labels
      • Create And Manage Tags
      • Create And Manage Groups
      • Configure Ticket Template
    • Data Protection Templates
      • View And Manage Pattern Variables
      • View And Manage Keyword Groups
    • View Version And Support Information
    • Alert Notification Settings
  • Appendix 1a - Xcitium Services - IP Nos, Host Names And Port Details - EU Customers
  • Appendix 1b - Xcitium Services - IP Nos, Host Names And Port Details - US Customers
  • Appendix 2 - Pre-configured Profiles
  • Appendix 3 - Default Xcitium Security Policy Details
  • About Xcitium

Import User Groups from LDAP


There are two ways to add users to Xcitium:

  1. Manually add users:

  • Enroll one user at a time

  • Import multiple users from a .csv file

  1. Import user groups from Active Directory (AD) servers

Xcitium Enterprise can be configured to access your AD server through the Lightweight Directory Access Protocol (LDAP). You can add multiple LDAP accounts.


Process in brief:

  • Add an LDAP server by specifying its IP address, domain and the login credentials of the AD server:

  • Click 'Settings' > 'Portal Set-Up' > select the 'Active Directory' tab > Click 'Add'

  • Once added, users and user groups in the AD directory will be visible in the 'Active Directory' interface:

  • Click 'Settings' > 'Portal Set-Up' > select the 'Active Directory' tab > Click on an AD domain name > Click the 'User Groups' tab

  • Select the users and groups you wish to import

  • Assign roles to users/user groups as required

  • Synchronize LDAP with Xcitium

  • The selected users/user groups will be imported and placed into respective groups in Xcitium

  • The 'User List' and 'User Groups' interfaces let you view/manage users and enroll user devices. See Users and User Groups for more details.

The Active Directory interface

  • Click 'Settings' > 'Portal Set-Up'

  • Click the 'Active Directory' tab
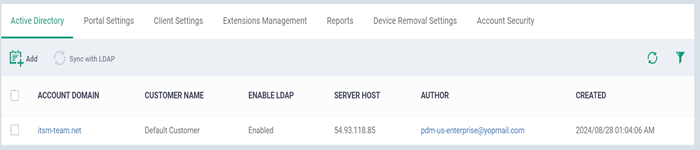


Column Heading

Description

Account Domain

The Active Directory domain name.

Click the domain name to:

  • View and import user groups

  • Configure device enrollment for imported users

  • Configure the connection between the AD server and Xcitium

See Manage LDAP Accounts for more details.

Customer Name

The organization associated with the AD domain

Enable LDAP

Whether or not the LDAP account is active

Server Host

The LDAP hostname or IP address of the AD server

Author

The admin who added the LDAP account

  • Click the admin name to view their details. See View User Details if you need help with this.

Created

The date and time at which the LDAP account was added


Note: Xcitium communicates with Xcitium servers and managed devices in order to update data, deploy profiles, synchronize LDAP server via devices and so on. You need to configure your firewall accordingly to allow these connections. The details of IPs, hostnames and ports are provided in Appendix 1.
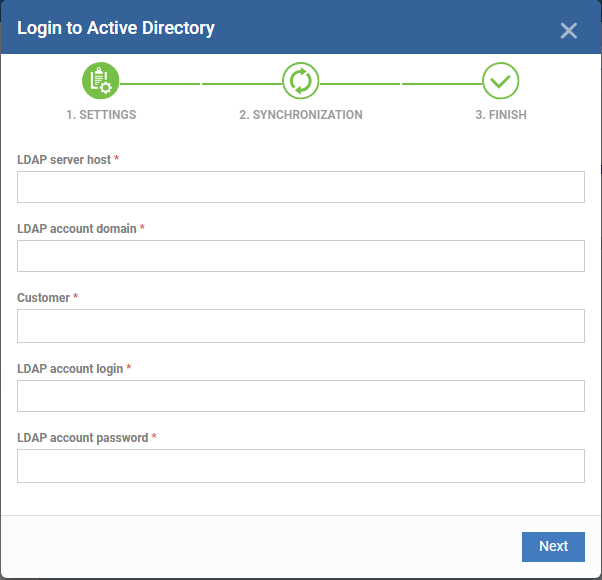

Add an LDAP account

  • Click 'Add' at the top

The 'Login to Active Directory' wizard opens:


Step 1 - Enter LDAP account details


Form Element

Description

LDAP Server Host

The IP address or hostname of the Active Directory (AD) server

LDAP Account Domain

The Active Directory domain name.

Company

Choose the company to which the AD server belongs. By default, it is your company. Leave the settings as 'Default Customer'.

LDAP Account Login

The admin username and password required to access the AD server.

LDAP Account Password

  • Click 'Next' after completing the settings form.

Step 2 - Configure Synchronization Settings
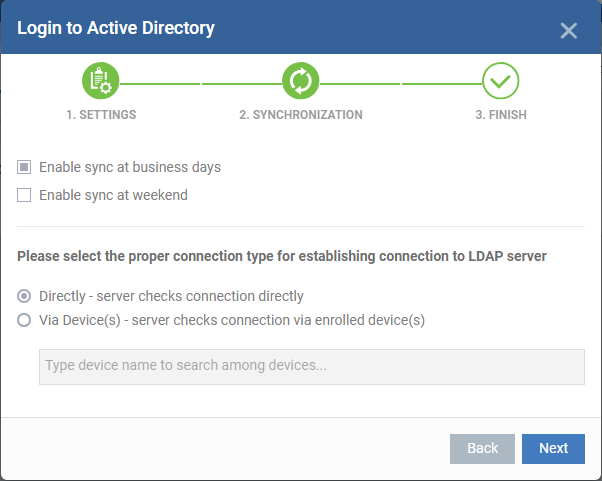


Sync Settings

  • Enable Sync at Business Days - Xcitium will automatically sync with the LDAP server once per day Monday through Friday to check for and import new users

  • Enable Sync At Weekend - Xcitium will automatically sync with the LDAP server once a day on Saturdays and Sundays to check for and import new users on weekends.

Note - you can manually sync at any time by clicking the 'Sync with LDAP' button.


Connection Type


The connections setting determine how Xcitium Enterprise connects to the LDAP server. You can connect directly from the Xcitium server or via the enrolled devices.


If you choose the second option, you should specify the names of enrolled Windows devices which are in the same network as the AD server.

  • Click 'Next'

Step 3 - Finish


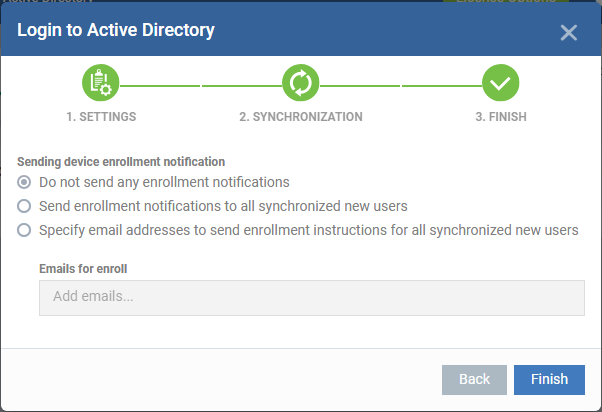
  • Do not send any enrollment notifications - No notification mails are sent to imported users.

  • Send enrollment notifications to all synchronized new users - Device enrollment emails are sent to imported users. These mails include instructions which tell the user how to add their device to Xcitium.

  • Specify email address to send enrollment notifications for all synchronized new users - Add the recipients who should receive a notification mail when new users are added. Usually sent to an administrator, the mail contains instructions on how to enroll devices for the new users. You can add multiple email addresses here.

  • Click 'Finish'

Xcitium Enterprise will connect to the LDAP server per the configuration. A summary of account settings is shown if the connection is successful:


  • Click 'Edit' if you want to change any details, edit the details and click 'Save' to save your settings.

The synchronization task will run as scheduled in step - 2, and the user groups will be added.

  • Click 'Sync with LDAP' to instantly sync the user groups between the AD server and Xcitium

  • Repeat the process to add more AD servers to import user groups from.

Manage LDAP Accounts


The Active Directory interface lets you view and edit the details of integrated AD servers, synchronize users between AD and Xcitium, and more.

  • Click 'Settings' > 'Portal Set-up' > 'Active Directory'

  • Click the AD domain name from the list of LDAP accounts to view or edit its details


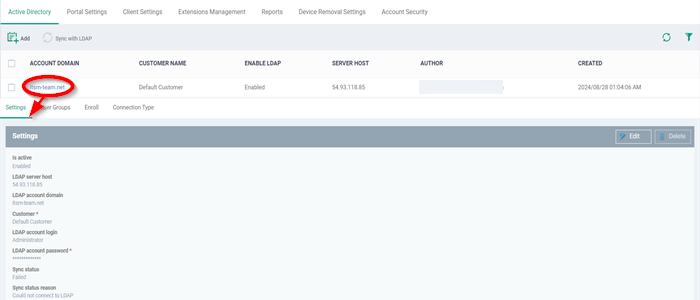
The Active Directory details will be displayed under four tabs:

  • Settings

  • User Groups

  • Enroll

  • Connection Type

Settings tab


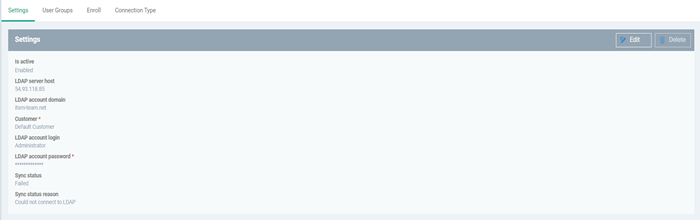
The 'Settings' tab displays AD configuration details:


  • Click 'Edit' to update any LDAP details and click the 'Save' button


User Groups tab


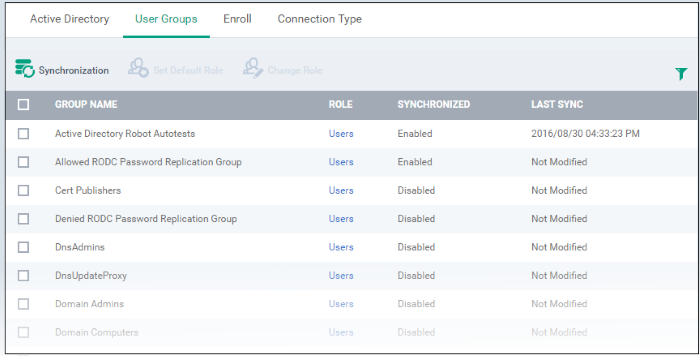
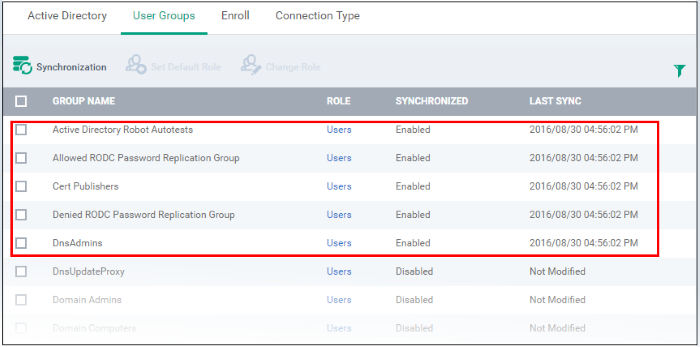
The 'User Groups' tab shows groups that were identified on the AD server. This includes users/groups created in the root folder and all sub-folders/custom folders on the AD server. This interface allows you to:

  • Selectively enable/disable AD synchronization for groups. Synchronization allows Xcitium to update its user list whenever users are added/removed from the AD server.

  • Select the roles to be applied to users in each AD group.

  • Manually synchronize groups before importing to Xcitium


Enable/disable synchronization

  • Select user group(s) from the list and click 'Synchronization' at the top:


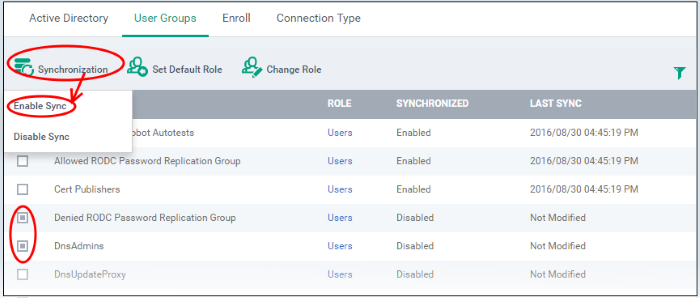
  • Select whether synchronization should be enabled or not from the drop-down. If enabled, Xcitium will periodically synchronize with the group to import new users and remove deleted users.

Assign roles to imported users

  • Select the user(s)/user group(s).

  • Select 'Set Default Role' to assign the default Xcitium user role to the users. See Set a role as the default role if you need help with this.


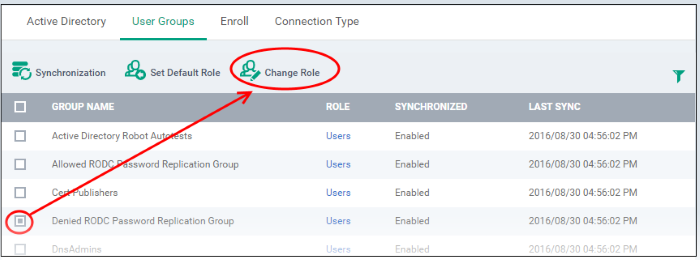
  • Select 'Change Role' if you want to assign a different role to imported users.


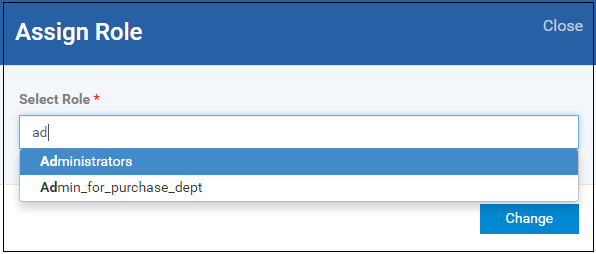
  • Type the first few characters of the name of the role to be assigned and select the role from the options.

The selected role will be displayed in the 'Role' column for the users/user groups.

  • Repeat the process to apply different roles to different users/user groups.

See 'Manage Roles Assigned to a User' for more details on roles.


Import users from selected user group

  • Click 'Sync with LDAP'


  • The LDAP user/user groups are synchronized with Xcitium and new users are imported. The 'User List'/'User Groups' interfaces will update appropriately. See 'Users and User Groups' if you need more help with users and groups.


Enroll tab


The 'Enroll' tab displays the current setting of enrollment notification sent to imported users.


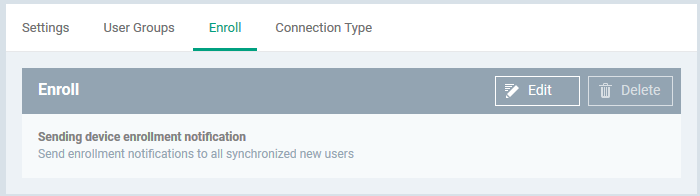
  • Click 'Edit' to change the enrollment notification type


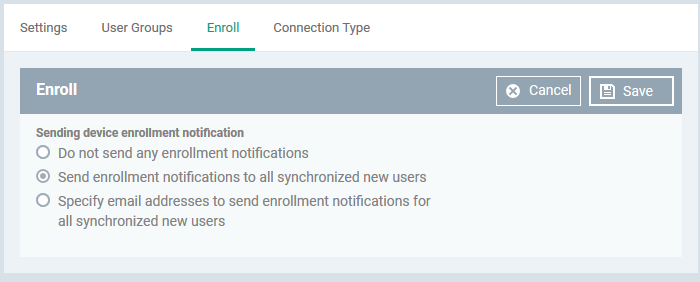
  • Do not send any enrollment notifications - No enrollment mails will be sent to users imported via LDAP.

  • Send enrollment notifications to all synchronized new users - Device enrollment emails will be sent to new users enrolled via LDAP.

  • Specify email address to send enrollment notifications for all synchronized new users - Specify email recipients who should receive a notification mail when new users have been added. Usually sent to an administrator, the mail will contain instructions on how to enroll devices for the new users. You can add multiple email addresses here.

  • Update the notification type from the options and click 'Save'

Connection Type Tab


The 'Connection Type' tab displays how the AD server currently connects to Xcitium.


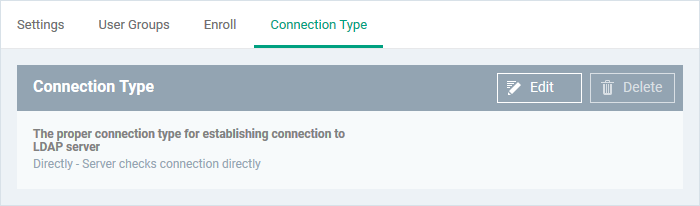
  • Click the 'Edit' button to change the connection type.


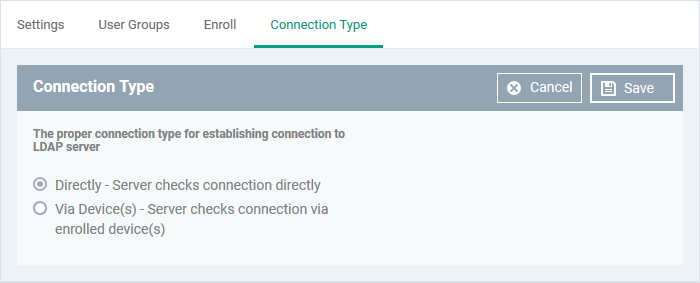
If the first option is selected, Xcitium will connect to the configured LDAP server directly. The second option enables the Xcitium server to connect to the LDAP server via enrolled devices. Multiple devices can be configured for the second option.

  • Click 'Save' after selecting the option.

You can add multiple LDAP servers for the account from the Active Directory interface. Click 'Add' and follow the same procedure explained above.


Active Directory Interface - Sorting, Search and Filter Options

  • Click on the column headers sorts items in alphabetical, ascending/descending order

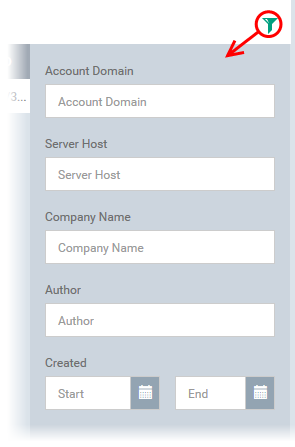
  • Click the funnel button to open filter options:

  • You can search for a specific LDAP account based by domain name, host and/or author. Enter your search criteria in the respective text boxes and click 'Apply'.

  • You can also filter by the date the account was created. Use the calendar buttons at the bottom to select start and end dates then click 'Apply'.

You can use any combination of filters to search for specific LDAP accounts.


Our Products
  • Free Antivirus
  • Free Internet Security
  • Website Malware Removal
  • Free Anti-Malware
  • Anti-Spam (Free Trial)
  • Windows Antivirus
  • Antivirus for Windows 7
  • Antivirus for Windows 8
  • Antivirus for Windows 10
  • Antivirus for MAC
  • Antivirus for Linux
  • Free Endpoint Security
  • Free ModSecurity
  • Free RMM
  • Free Website Malware Scanner
  • Free Device Manager for Android
  • Free Demo
  • Network Security
  • Endpoint Protection
  • Antivirus for Android
  • Comodo Antivirus
  • Wordpress Security
Cheap CDN
  • Bootstrap CDN
  • Semantic UI CDN
  • Jquery CDN
  • CDN Plans
  • CDN
  • Free CDN
Enterprise
  • Patch Management Software
  • Patch Manager
  • Service Desk
  • Website Down
  • Endpoint Protection Solutions
  • Website Security Check
  • Remote Monitoring and Management
  • Website Security
  • Device Manager
  • ITSM
  • CRM
  • MSP
  • Android Device Manager
  • MDR Services
  • Managed IT Support Services
  • Free EDR
Free SSL Certificate
Support Partners Terms and Conditions Privacy Policy

© Comodo Group, Inc. 2025. All rights reserved.