View the Files on a Device
-
The 'File List' tab shows executable files found on a device along with their trust rating.
View files on a Windows device
-
Click 'Assets' > 'Devices' > 'Device List'
-
Click the 'Device Management' tab
-
Select a group on the left to view only its devices
Or
-
Select 'Show all' on the left to view every device enrolled to Xcitium
-
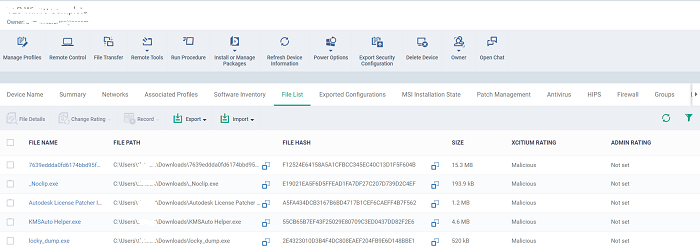
Click the name of a Windows device then select the 'File List' tab:
|
Column Heading |
Description |
|---|---|
|
File Name |
The label of the executable file or application. |
|
File Path |
The installation location of the application at the endpoint.
|
|
File Hash |
The SHA1 hash value of the executable file.
|
|
Size |
The size of the executable file. |
|
Xcitium Rating |
The trust rating of the file as per the Xcitium File Look-up service, reported by the XCS installations at the endpoints |
|
Admin Rating |
The trust rating of the file as manually set by the administrator, if any. |
Xcitium Client Security monitors all file activity on a Windows endpoint. New executables are scanned against the Xcitium files database and rated as 'Unrecognized', 'Trusted' or 'Malicious'. You can configure this behavior in the 'File Rating settings' section of the configuration profile applied to the device. See File Rating settings in Create a Windows Profile for more details.
Files that could not be identified as 'Trusted' or 'Malicious' by Xcitium Client Security (XCS) are reported as 'Unrecognized' to Xcitium. You can review these files and manually rate them as 'Trusted' or 'Malicious' if required.
-
The rating you set is purely a local trust rating for the file. It does not affect the global rating set by Xcitium.
-
The 'Xcitium Verdict Cloud' section of a profile lets you auto-upload unknown files to the cloud for behavior analysis.
See Valkyrie Settings for more details
|
Background Note: Valkyrie is a file verdicting service that tests unknown files with a range of static and dynamic checks. The results of these tests produce a trust verdict on the file. See View List of Valkyrie Analyzed Files for more details. |
Files are identified as trusted in the following ways:
-
Cloud-based file lookup service (FLS) - Whenever a file is accessed, Xcitium Client Security (XCS) checks the file's reputation on Xcitium online file database. It also consults the local list of trusted vendors.
The file is classed as trusted if:
-
The app is from a vendor with a 'Trusted' status in the local vendor list in XCS
-
The app trusted is on Xcitium online file database (aka, it is whitelisted)
-
Admin rating - Admins can assign a 'Trusted' rating to files from the Application Control interface
-
User Rating - Users can assign a 'Trusted' rating to files at the local XCS installation in two ways:
In response to an alert. If an executable is unknown then it may generate a HIPS alert on the local endpoint. Users could choose 'Treat this as a Trusted Application' at the alert
The user can assign 'Trusted' rating to any file from the 'File List' interface.
XCS creates a hash of all files assigned 'Trusted' status by the user. In this way, even if the file name is changed later, the file will retain its trusted status as the hash remains same. This is particularly useful for developers who are creating new applications that, by their nature, are unknown to the Xcitium safe list.
Files identified as malicious by
the File Look-Up Service (FLS) will not be allowed to run by default.
These files are reported as malware to Xcitium.
The File List screen
Possible file ratings are 'Unrecognized', 'Trusted' or 'Malicious'. Administrators can manually set the file rating at their discretion.
-
Files rated as 'Trusted' are allowed to run.
-
Files rated as 'Malicious' are quarantined and not allowed to run.
-
Files rated as 'Unrecognized' are run inside the container - an isolated operating environment. Contained applications are not permitted to access files or user data on the host machine.
Any ratings set by the administrator are propagated to all enrolled endpoints.
|
Tip: if you wish to see all files across all managed devices, please view the 'Software Inventory' > 'Applications' and 'Application Control' interfaces. See 'Software Inventory' > 'Applications' > Mobile Applications' to view applications in mobile devices. |
Sorting, Search and Filter Options
-
Click any column header to sort items in alphabetical order
-
Click the funnel icon to
 open more filter options
-
Use the check-boxes to show or hide non-executable, hidden, not analyzed or unrecognized files.
-
Use the search fields to filter by file name, file path or SHA1 hash value. You can also filter by file size and the number of devices on which the file is present.
-
Use the drop-down boxes to filter items by Xcitium and/or admin rating
-
Clear any search filters and click 'OK' to display all items again.
You can use any combination of filters simultaneously to search for specific apps.
Manage
Applications
The 'File List' interface allows you to:
-
Simply click on a file in the list or select a file and click 'File Details' at the top.
-
The File Details screen contains two tabs:
-
File info - Shows basic file details and the devices on which the file is present. You can also change the trust rating of the file in this area.
-
Device List - Displays the list of managed Windows devices on which the file is discovered. The 'Device List' interface also allows you to view the process activities of the file in respective devices.
-
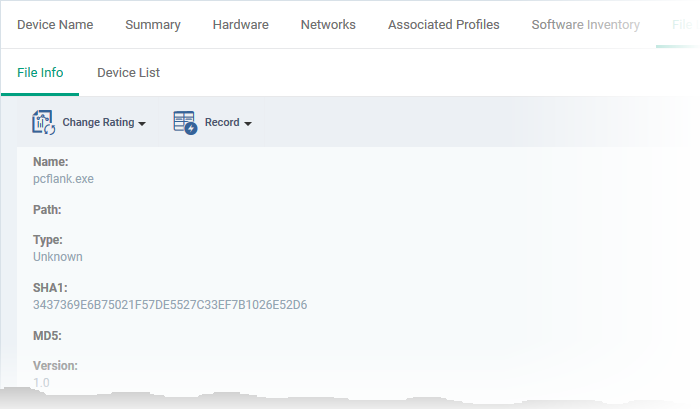
The file info screen shows file name, installation path, file type, version, size, hash values and the date the file was first encountered. The screen also shows the file's trust rating and the number of endpoints on which the file is present.
-
The 'Change Rating' button allows you to manually set the file's rating as 'Trusted', 'Malicious' or 'Unrecognized':
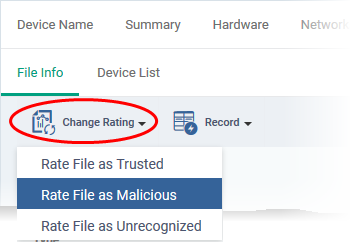
The new rating will be sent to all endpoints.
-
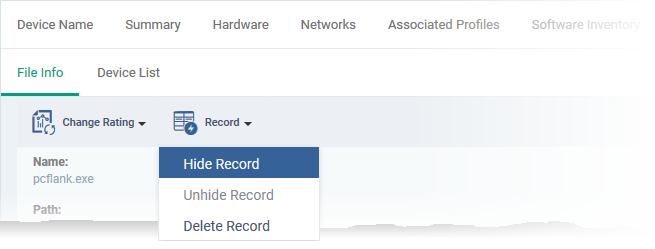
The 'Record' button lets you hide, display or remove the file from the 'File List' screen.
Device List Screen
-
The device list screen shows the list of endpoints on which the item was discovered. The screen also shows the installation path, the installation date and the file rating assigned by Xcitium Client Security. The Viruscope column shows detailed info on processes started by the file.

-
You can remove the file from device(s) by selecting a device then clicking 'Delete'.
-
Each file on an endpoint is automatically scanned and assigned a trust rating by Xcitium Client Security.
-
These ratings can be either 'Unrecognized', 'Trusted' or 'Malicious'. The rating for each file is shown in the 'Xcitium Rating' column of the 'File List' screen.
-
The file rating determines whether or how the file is allowed to run:
-
Trusted - The file will be allowed to run normally. It will, of course, still be subject to the standard protection mechanisms of Xcitium Client Security (behavior monitoring, host intrusion prevention etc).
-
Malicious - The file will not be allowed to run. It will be automatically quarantined or deleted depending on admin preferences.
-
Unknown - The file will be run inside the container. The container is a virtual operating environment which is isolated from the rest of the endpoint. Files in the container write to a virtual file system, use a virtual registry and cannot access user or operating system data.
-
Automatic file rating can be configured in the 'File Rating' section of the configuration profile active on the endpoint. See File Rating settings in Create a Windows Profile for more details.
-
Click 'Change Rating' in the 'File List' interface to manually set a rating for a selected file or files. The new rating will be propagated to all endpoints and will determine the file's run-time privileges. Admin assigned ratings will be shown in the 'Admin Rating' column of the interface.
Assign a file rating to a file
-
Select the file(s) whose rating you want to change and click the 'Change Rating' button.
-
Choose the rating you want to from the drop-down:
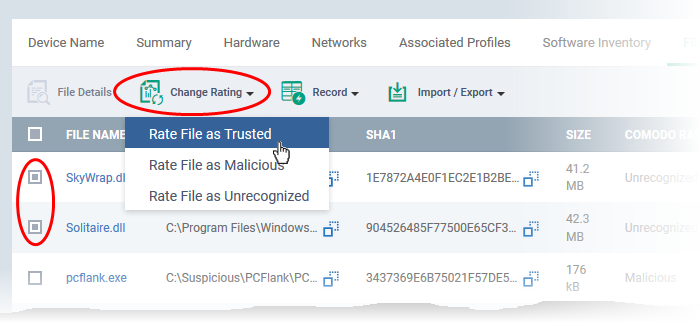
As mentioned, the new admin rating will be set and sent to all endpoints. The Admin Rating will determine the file's run-time privileges.
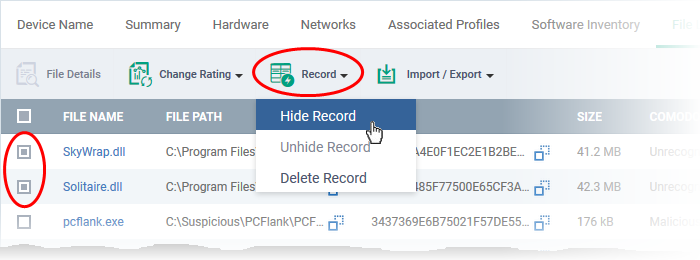
-
Select 'Hide / Unhide / Delete Record' as required.
View hidden files
-
Click the funnel icon at the top-right to open the filter options
-
Select 'Show with hidden file(s)' and click 'Apply'
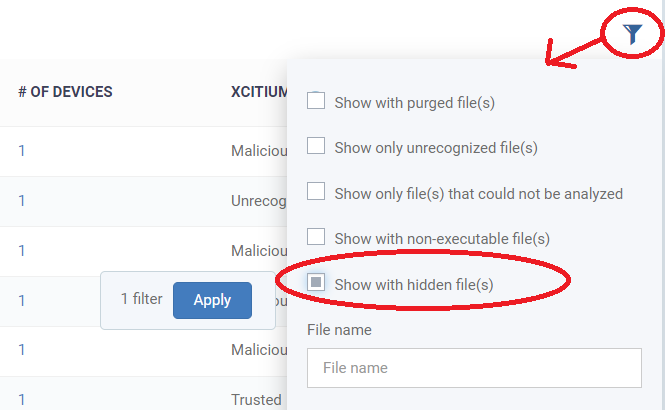
The hidden files will be added to the list in the 'File List' screen. The files will be highlighted with a gray stripe.
Restore hidden files
-
Click the funnel icon at the top-right to open the filter options
-
Enable 'Show with hidden file(s)'
-
Select the hidden files you want to restore and click 'Unhide Record' from the drop-down
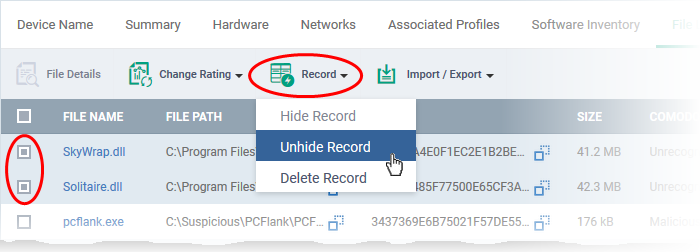
The
files will be displayed in the permanently.
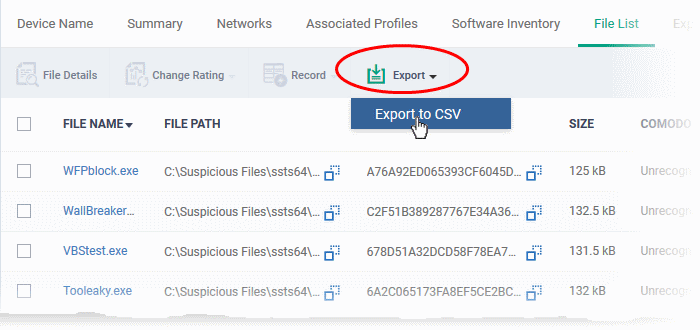
You can export the 'File List' to a comma-separated values (CSV) file as follows:
-
Click the 'Export' button above the table then choose 'Export to CSV':
-
The CSV file will be available in 'Dashboards' > 'Reports'
-
See Reports in The Dashboards for more details
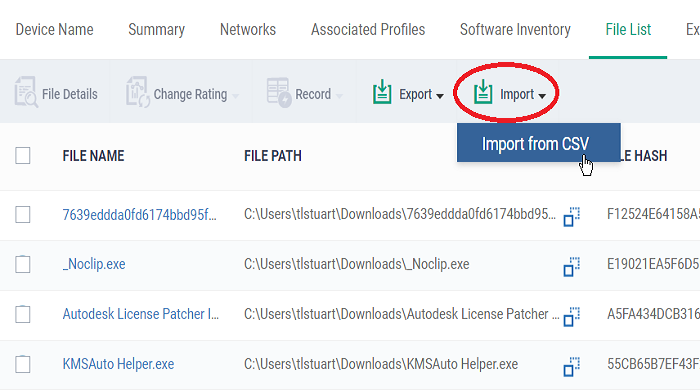
You can import the 'File List' using a comma-separated values (CSV) file as follows:
-
Click the 'Import' button above the table and then select the CSV file which needs to be imported:
You can remove items you no longer wish to see in 'File List'
screen. Deleted files will only be removed from the list. They will
remain on the endpoints themselves.
-
Select the files you want to remove and click 'Record' at the top
-
Choose 'Delete Record' from the drop-down


