View and Manage Blocked Threats
Click 'Security' > 'Endpoint Security' > 'Blocked Threats'
-
The 'Blocked Threats' shows malicious items on which no action has yet been taken. This is malware that was prevented from running, but has NOT been quarantined or deleted.
-
You can use this interface to clean (delete), ignore, or quarantine the items.
-
You can also assign a 'Trusted' rating to an item if you think it is a false positive. The item will not be flagged by future scans.
-
By default, Xcitium sends an alert to admins when new malware is added to this page. You can enable/disable these alerts in 'Settings' > 'Settings' > 'System Templates' > 'Email Notifications'.
How do files get on this list?
|
Background. This box explains the conditions under which a file will appear in the blocked threats list. Windows Devices: Real-time virus monitor:
Scheduled and manual scans:
Mac OS Devices:
Linux Devices:
Android Devices:
|
-
Click 'Security' > 'Endpoint Security' > 'Blocked Threats'
Select a group to view threats identified on their devices in that group
Or
Select 'Show All' to view threats identified on every device in Xcitium
|
Column Heading |
Description |
|---|---|
|
OS |
The operating system of the device on which the malware was identified. |
|
Device Name |
The label of the device on which threats were found. If no name was assigned then the model number
of the device is used. Gray text color shows the device has been offline for the past 24 hours.
|
|
Application Name |
The label of the infected file. |
|
Package Name / File Path |
Windows, Linux and Mac OS devices - Shows the location of the malware Android devices - Shows the package name or identifier.
|
|
File Hash |
The SHA1 hash value of the file.
|
|
Signature |
The malware signature.
|
|
Detection Date |
Date and time that the malware was discovered. |
|
Controls |
|
|
Delete Malware |
Uninstalls/removes the malware infected item from the device.
|
|
Ignore Malware |
The item will be allowed to remain on the device.
|
|
Quarantine Malware |
Moves the selected items to quarantine on the respective devices.
|
|
Rate as Trusted |
Awards 'Trusted' file rating to the selected items. Please make sure before marking a file as trusted. Use this option only for false positives and genuine items.
|
|
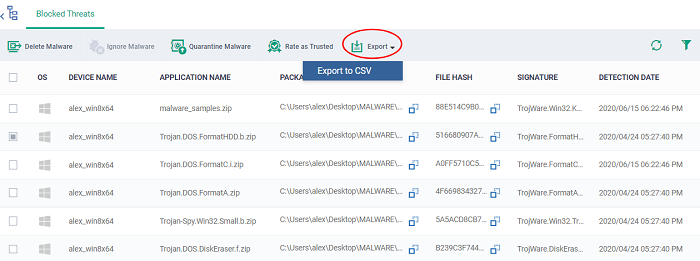
Export |
Save the list of currently displayed threats as
a comma separated values (CSV) file. The exported .csv is available in 'Dashboard' > 'Reports' See Export the List of Malware for more details. |
-
Click any column header to sort items in ascending/descending order.
-
Click the funnel icon
 on the right to filter items by various criteria.
-
Start typing or select the search criteria in the search field to find a particular item and click 'Apply'
-
To view all items again, clear any filters and search criteria and click 'Apply'.
-
You can uninstall/delete malicious items from the devices on which they were found.
-
Alternatively, if you think an item is a false positive, you have the following options:
Ignore malware - Applies to items identified on Android devices only. The item will not be uninstalled and will be skipped in the future scans.
Rate as 'Trusted' - Applies to items identified on Windows devices only. The item will be allowed to run and will be skipped in future scans.
-
If an item is found to be suspicious, you can choose to move it to quarantine for later analysis and removal.
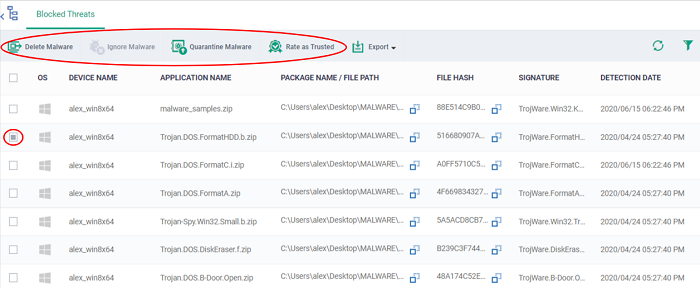
The options at the top of the table let you take actions on selected items. The available actions depend on the operating system of the device(s).
Threats identified on Android Devices
Action on malware depends on the
Android device type. Knox and non-Knox devices. Knox is a security
technology used by Samsung for its devices.
First, select the items on which you want to take the action. Then click one of the following:
-
Ignore Malware - Select if the item is a false positive. The item will remain on the device and skipped in future scans.
-
Delete Malware - Select if you want to remove the malware from the device.
Knox devices - Applications with viruses or infected files on the devices and from the SD card are deleted without any alert on the device.
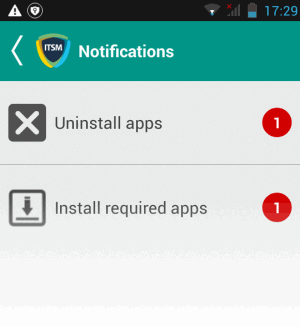
Non-Knox devices - Infected files on the SD card are deleted without any alert. The following notification is sent to the affected device for removal of malware on the device.
-
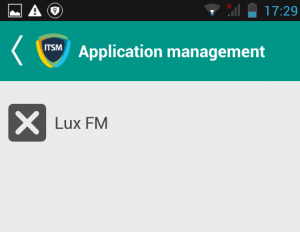
Touch the alert to view a list of all items which are ready to be removed:
-
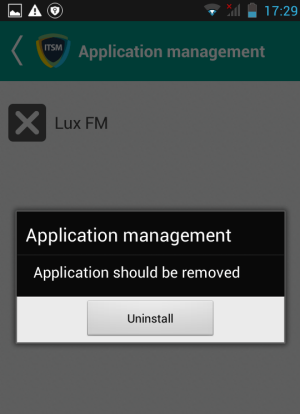
Tap on the malware to be removed, confirm the removal in the next dialog and follow the uninstall wizard.
Threats identified on Windows Devices:
First,
select the items on which you want to take the action. Then click one
of the following:
-
Delete Malware - Will remove the malware from the device.
-
Quarantine Malware - The items will be moved to quarantine on the respective devices. You can delete the items from quarantine later, or restore them to their original locations. See View and Manage Quarantined Items for more details.
-
Rate as Trusted - Trusted files are considered safe to run. Trusted items can run outside the container on devices and will be skipped in future scans. See File Ratings Explained for more details on trust ratings of files.
Threats identified on Mac OS Devices:
First,
select the items on which you want to take the action. Then click one
of the following:
-
Delete Malware - Will remove the malware from the device.
-
Quarantine Malware - The items will be moved to quarantine on the respective devices. You can delete the items from quarantine later, or restore them to their original locations. See View and Manage Quarantined Items for more details.
Threats identified on Linux Devices:
First,
select the items on which you want to take the action. Then click one
of the following:
-
Delete Malware - Will remove the malware from the device.
-
Quarantine Malware - The items will be moved to quarantine on the respective devices. You can delete the items from quarantine later, or restore them to their original locations. See View and Manage Quarantined Items for more details.
Export the List of blocked threats
-
Click 'Security' > 'Endpoint Security' > 'Blocked Threats'
-
Click the funnel icon to filter which records are included in the report.
-
Click the 'Export' button then choose 'Export to CSV':
-
The .csv file is available in 'Dashboard' > 'Reports'
-
See Reports in The Dashboards for more details.


