


Remote Management of Windows and Mac OS Devices
-
Click 'Settings' > 'Settings' > 'Portal Setup' > 'Extensions Management' to enable remote control for your account.
-
The remote control feature lets you remotely access Windows and Mac devices to solve issues, install third party software, and run system maintenance.
-
You can also transfer files and folders between the local and remote computers.
-
First, install the remote control application on your admin computer:
-
Click 'Assets' > 'Devices' > 'Bulk Installation Package'
-
Click the 'Remote Control by Xcitium tab
-
Choose the operating system of your admin machine
-
Click 'Download'
-
After installation, there are two ways you can take over devices:
-
Use the standalone remote control application
OR
-
Use Xcitium Enterprise Platform - Click 'Assets' > 'Devices' > 'Device List' > 'Device Management' > select a device > click the 'Remote Control' button.
-
For additional security, you can assign custom ports on the device to handle the remote connection. You can configure the ports by adding a 'Remote Control' section to the device profile.
-
See Remote Control Settings for Windows devices and Remote control Settings for Mac OS Profile if you want to read more about this.
-
The viewer supports clip-board sharing between your computer and the managed device.
-
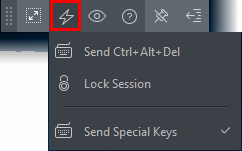
You can also use key combinations such as 'Ctrl+Alt+Del', 'Alt+F4' and 'Ctrl+C' on the remote machine.
-
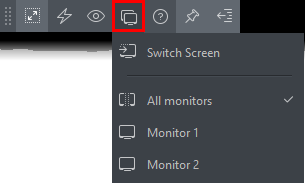
You can view individual or all monitors if the target has a multi-monitor setup
See the following sections for more help:
Download and install the viewer
-
Click 'Assets' > 'Devices' > 'Bulk Installation Package'
-
Select the 'Remote Control by Xcitium' tab
-
Choose the operating system of your admin machine
-
Click 'Download'
-
Install on your local machine
-
Once installed, you can launch the remote control viewer from your desktop
-
You can also take control direct from the Xcitium interface:
-
Click 'Assets' > 'Devices' > 'Device List' > 'Device Management' > select a Windows / Mac OS device > Click the 'Remote Control' button.
-
Note - A warning message is shown for Windows devices if you attempt remote control outside of a maintenance window. This is shown if you access via Xcitium interface.
Access the remote control viewer
-
Double click the desktop shortcut
 or the system tray icon
  to open the
login screen:
to open the
login screen:
-
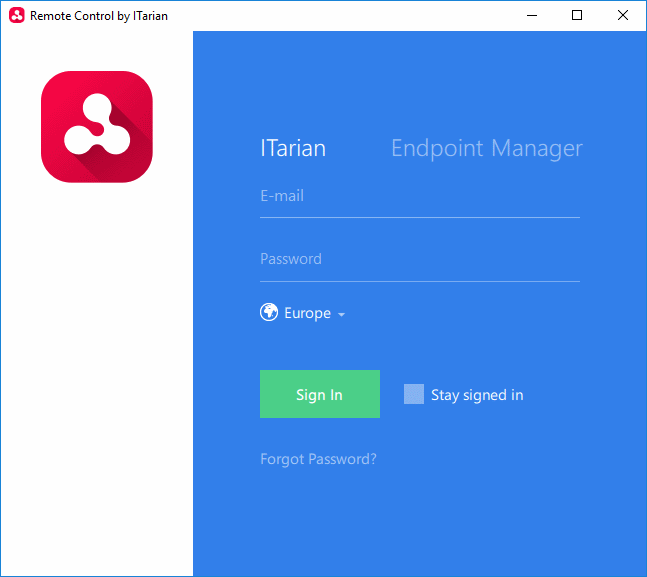
Xcitium account administrator - Click the 'Xcitium' tab then login with your Xcitium Enterprise Portal portal username and password
-
The region selector allows you to choose the Xcitium hosted service closest to your location. Select the location nearest to you for the best performance / fastest connection.

-
Select 'Stay Signed in' if you want the RC application to store your login credentials. The application will not ask for your credentials to login in future.
-
Click 'Sign In'
-
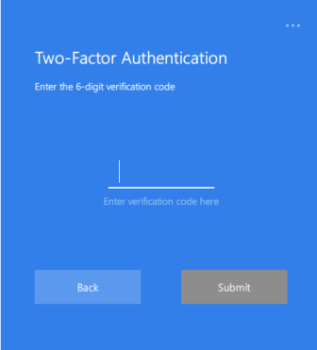
If 'Two-Factor Authentication' is enabled for your account, then you have to enter the authentication code generated in the 'Google Authenticator' app on your mobile device. Click here to find out how to configure two-factor login settings.
-
Enter the code generated on your mobile device and click 'Submit'
-
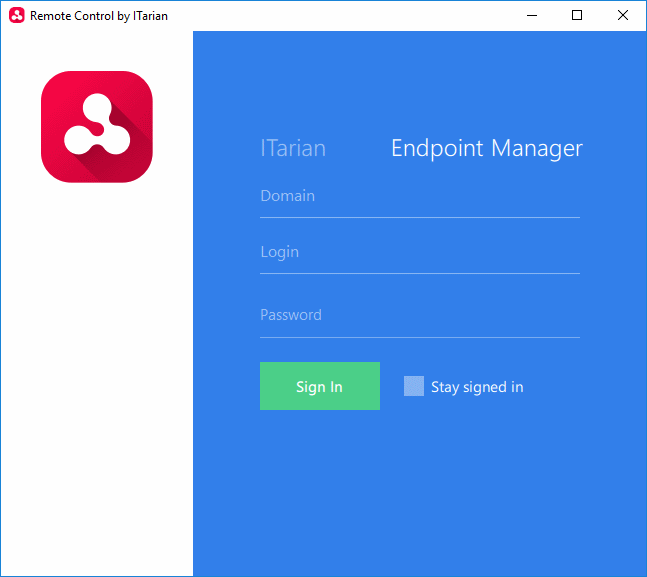
Admin users created in Xcitium platform - Click the 'Endpoint Manager' tab then enter your Xcitium URL and your login credentials. Your Xcitium URL will use the format https://[your Xcitium company name]
.itsm-us1.Xcitium.com/ where [your Xcitium company name] is your company name as assigned by Xcitium. This URL is available in the admin account activation email sent to you when you were enrolled.
-
Select 'Stay Signed in' if you want the RC application to store your login credentials. The application will not ask for your credentials to login in future.
-
Click 'Sign In'
|
Tip: The remote control application will save your login credentials even if you forget to enable 'Stay Signed in'. |
-
If 'Two-Factor Authentication' is enabled for your account, then you have to enter the authentication code generated in the 'Google Authenticator' app on your mobile device. Click here to find out how to configure two-factor login settings.
|
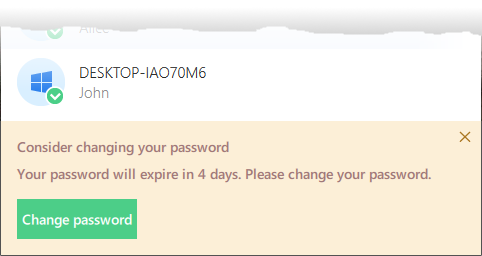
Note - Xcitium admins only - The 'Remote Control' tool notifies you if your password is about to expire within next seven days, or already expired.
|
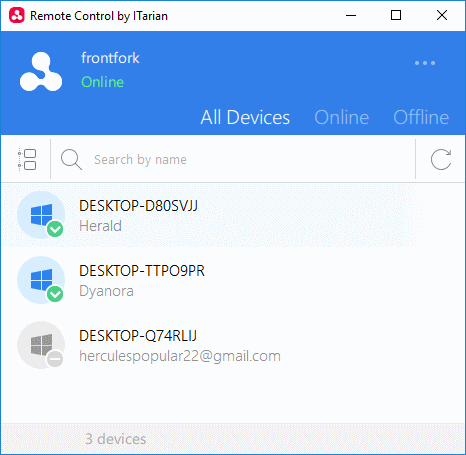
The viewer application will open with a list of enrolled Windows / Mac OS endpoints:
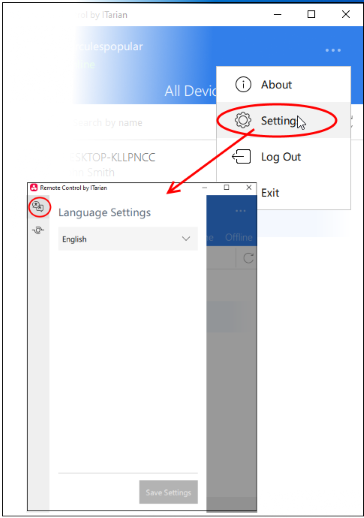
Language Settings
-
Click the ellipsis button at top-right of the app
-
Click 'Settings' to open language options:
-
Choose the language you require from the drop-down then click 'Save Settings'. This determines the language you see in the remote control application.
-
A notification box is shown on endpoints when you take over their machine. This box states the name of the person connected and the session duration etc.
-
The notification is in the language of the operating system IF the OS is English, Russian, Spanish, German, French, Portuguese or Chinese.
-
English is used if the OS is of any other language.
-
Examples:
-
You choose 'Russian' but connect to a Spanish PC - Notification is shown in Spanish.
-
You choose 'Russian' but connect to a Bulgarian PC - Notification is shown in English
-
You choose 'Russian' and connect to a Russian PC - Notification is shown in Russian
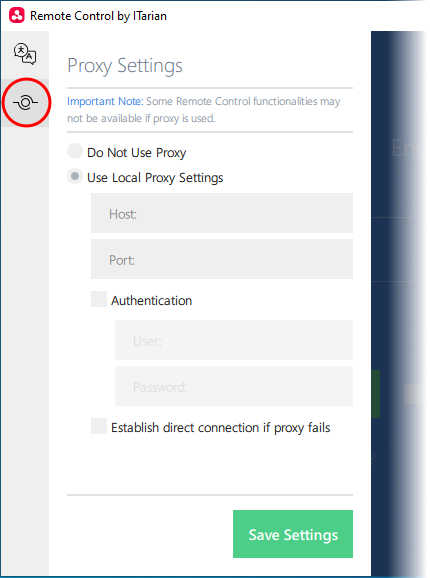
Proxy Server Settings
You can configure a proxy through which you want to connect to managed endpoints.
-
Click the ellipsis button then 'Settings'
-
Click the proxy server icon on the left of the settings page:
-
Do Not Use Proxy - The remote control tool will establish a direct connection to the endpoint
-
Use Local Proxy Settings - Use a proxy to connect to endpoints.
-
Host - Enter the IP address or the host name of your proxy server
-
Port - The port on your proxy server that the remote control tool should connect to.
-
Authentication - If your proxy server requires authentication, enter the UN/PW here.
-
Establish direct connection if proxy fails - Allow the remote control tool to fallback to a direct internet connection if the proxy fails.
-
If you specify a proxy but disable direct connection, then the remote control tool will not be able to connect to endpoints if the proxy fails
-
Leave the direct connection option enabled to ensure you can access endpoints at all times
-
Click 'Save Settings'
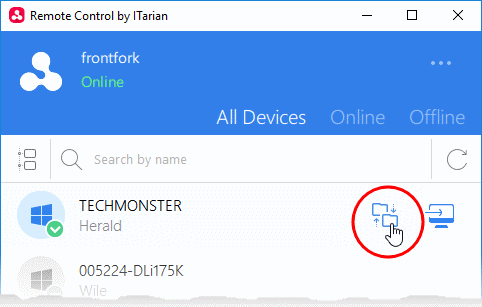
Remotely manage an endpoint
-
Move your mouse over an endpoint and click the remote desktop icon on the right:
The following message is shown to end-users if configured appropriately:
-
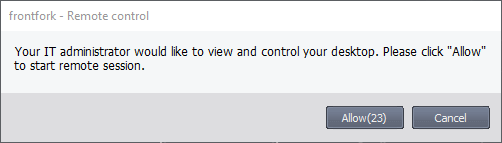
Take remote control of the device without permission from the user.
-
Ask for permission and take control if the user allows. Automatically take control if the user does not respond.
-
Disable remote control entirely.
-
See Remote Control Settings for Windows devices and Remote control Settings for Mac OS Profile for Mac OS devices, if you need more info on this.
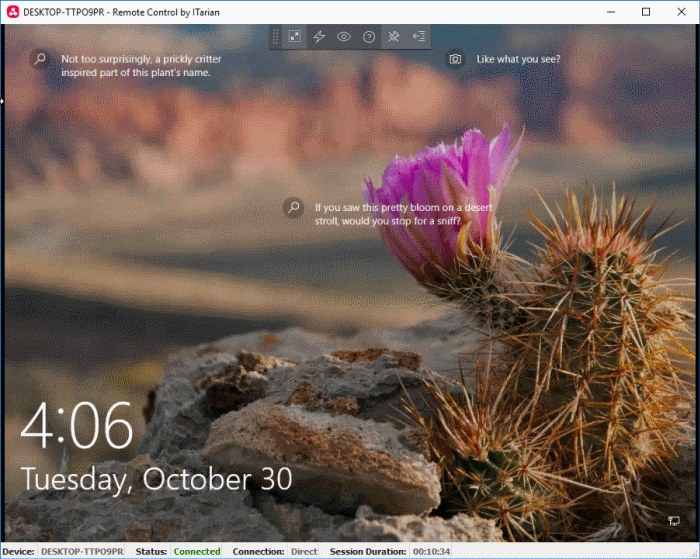
The following notification appears
on the endpoint when you have established control:
You can configure the endpoint notification box in the 'Remote Control' section of a profile.
-
Click 'Configuration Templates' > 'Profiles' > 'Add Profile Section' > 'Remote Control'
You can now access the desktop of the remote computer:
-
You can interact with the target device to perform tasks as required.
-
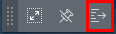
Use the toolbar at the top of the interface to perform the following actions:
 |
Full Screen - The remote desktop will cover your entire display, without the operating system's window-framing interface.
|
 |
Position - Click and drag the tool bar to your preferred location. |
 |
Pin - Lock or unlock the tool bar to the title bar in full screen view. |
  |
Minimize/Maximize - Show/hide tool bar options. |
|
|
Actions - Send control commands to the endpoint.
|
|
|
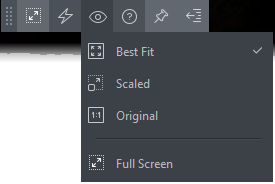
View - Change the display size of the remote desktop. The available options are:
|
|
Multi-Screen - The multi-screen icon only appears if the target point endpoint has a multi-monitor setup. The drop-down shows all monitors connected to the endpoint and allows you to choose which to view.
|
|
|
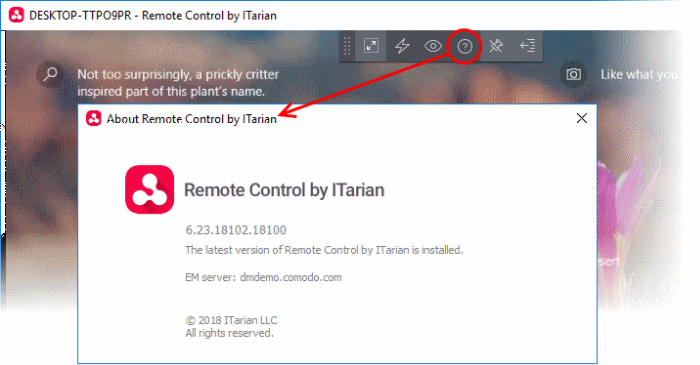
Help - Shows the 'About
Remote Control' dialog which shows version number and copyright
information. |
|
|
Admin Device |
Managed Remote Device |
|
|---|---|---|
|
Windows |
Mac OS |
|
|
Windows |
'Windows' key is sent only to the remote device Shortcuts in combination with 'Windows' key are applied only to the remote device |
'Windows'/'Command' key is sent only to the remote device. Exceptions:
PRINT SCREEN and NUMLOCK are not sent to remote device NumPad digit keys always behave as arrow-keys on Mac OS 'Context Menu' key is sent as zero scan code and appears as key 'a'. |
|
Mac OS |
All Shortcuts with 'Windows'/'Command' key are applied to the remote device, except 'Windows'/'Command' key+Esc Command+Tab - Switches between applications F11 - Shows desktop Ctrl +Up Arrow - Shows all Windows Ctrl+Down Arrow - Shows active application Window |
If Apple is keyboard used: Media buttons (e.g. PLAY , STOP, MISSION CONTROL), POWER, EJECT keys and all system shortcuts with these keys are applied only to the local device. Shortcuts with COMMAND are applied to the remote device, except 'COMMAND' key+Esc
If
non-Apple keyboard is used: Shortcuts with WIN are applied to the remote device, except 'WIN' key+Esc
|
-
Full list of Windows keyboard shortcuts -https://support.microsoft.com/en-us/help/12445/windows-keyboard-shortcuts.
-
Full list of MAC keyboard shortcuts -https://support.apple.com/en-us/HT201236.