


Create Ticket
- Click 'Tickets' > 'Create Ticket' to open this interface. You can also click '+ New Ticket' on the Dashboard or on the 'All Tickets' screen.
Use this screen to raise a ticket by hand — for a phone call, a walk-up or anything else that did not arrive through an automated channel. The form records who reported the issue, how the ticket should be routed and what the problem is.
You can identify the reporter from the existing user list or type their contact details in, set the routing and priority, write the description with a rich-text editor, attach files, and read the AI's suggestions before you submit.
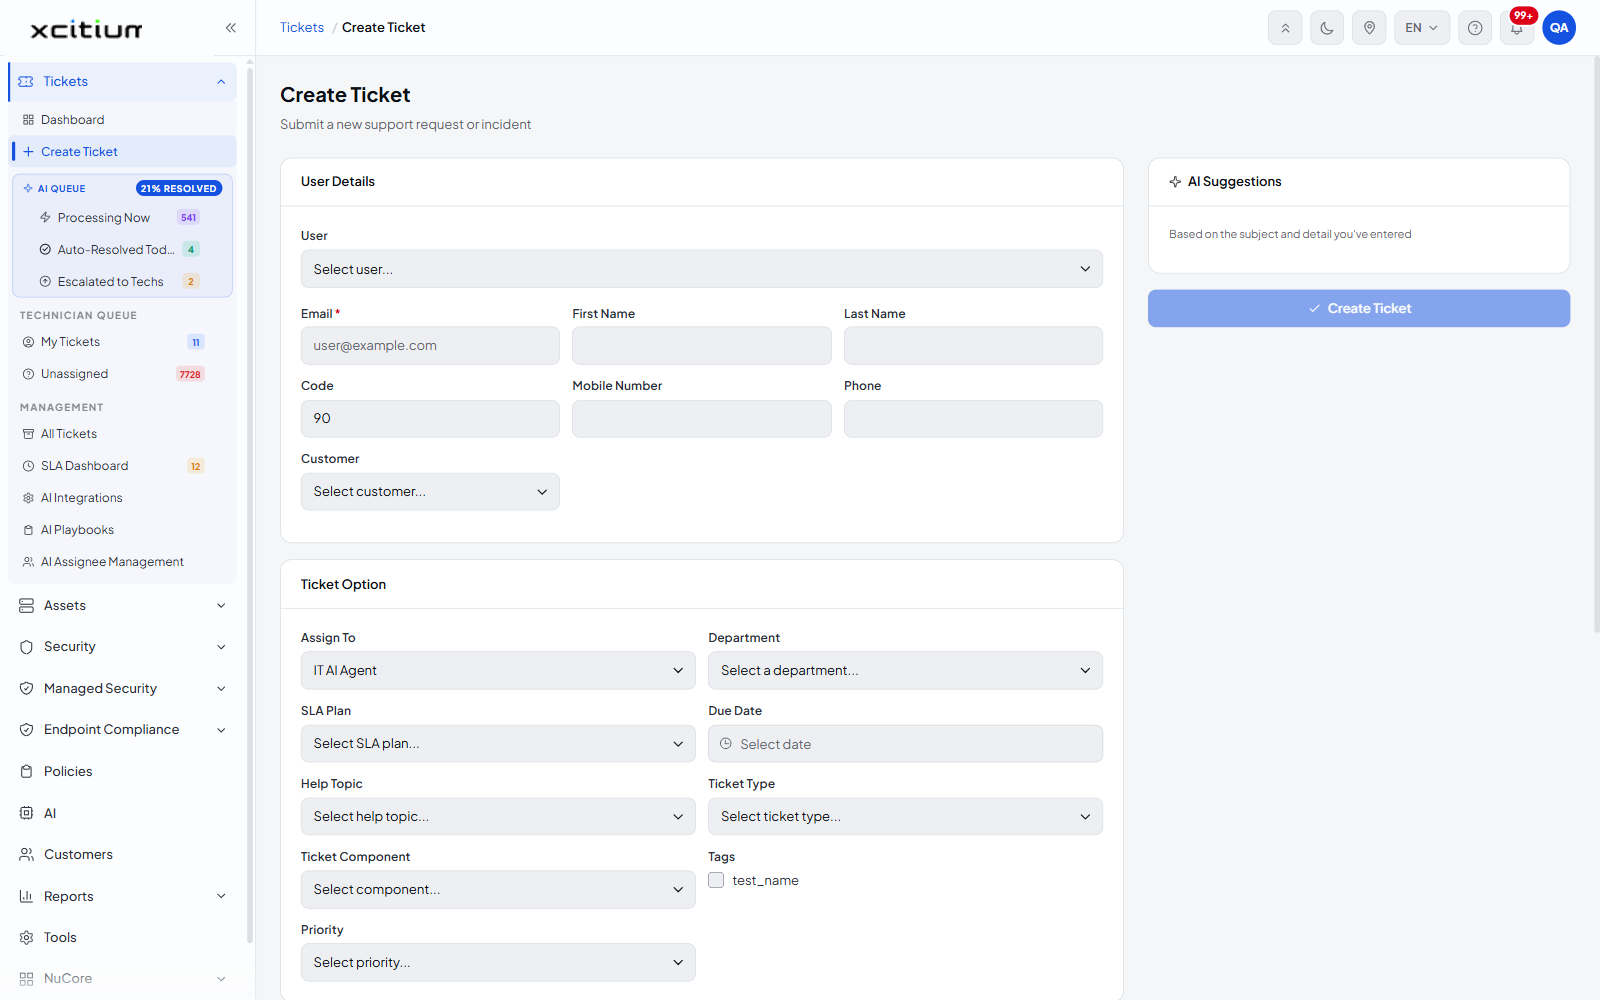
How the screen is laid out
The heading is 'Create Ticket' with the line 'Submit a new support request or incident'. The form is split into three cards down the left — 'User Details', 'Ticket Option' and 'Ticket Detail' — with an 'AI Suggestions' panel and the 'Create Ticket' button on the right.
The User Details card
This card records who the ticket is for.
| Field | Type | Required |
| User | Dropdown | No |
| Text (email) | Yes | |
| First Name | Text | No |
| Last Name | Text | No |
| Code | Text | No |
| Mobile Number | Text | No |
| Phone | Text | No |
| Customer | Dropdown | No |
The Ticket Option card
This card controls routing, classification and the due date.
| Field | Type | Options / default | Required |
| Assign To | Dropdown | 'Select an agent...', followed by the agents you can assign to, such as 'IT AI Agent'. 'IT AI Agent' is selected by default, so a new ticket goes to the AI service agent unless you change it. | No |
| Department | Dropdown | 'Select a department...' by default, then the departments configured in your account, for example 'Support', 'Sales', 'Maintenance'. | No |
| SLA Plan | Dropdown | 'Select SLA plan...' by default, then the SLA plans configured in your account, for example 'Default'. | No |
| Due Date | Date picker | Empty. Placeholder 'Select date'. | No |
| Help Topic | Dropdown | 'Select help topic...' by default, then the help topics configured in your account, for example 'Support query'. | No |
| Ticket Type | Dropdown | 'Select ticket type...' by default, then the ticket types configured in your account, for example 'QA Task'. | No |
| Ticket Component | Dropdown | 'Select component...' by default, then the components configured in your account. | No |
| Tags | Checkboxes | One checkbox per tag configured in your account. All are cleared by default. | No |
| Priority | Dropdown | 'Select priority...' by default, then 'Low', 'Normal', 'High' and 'Critical'. | No |
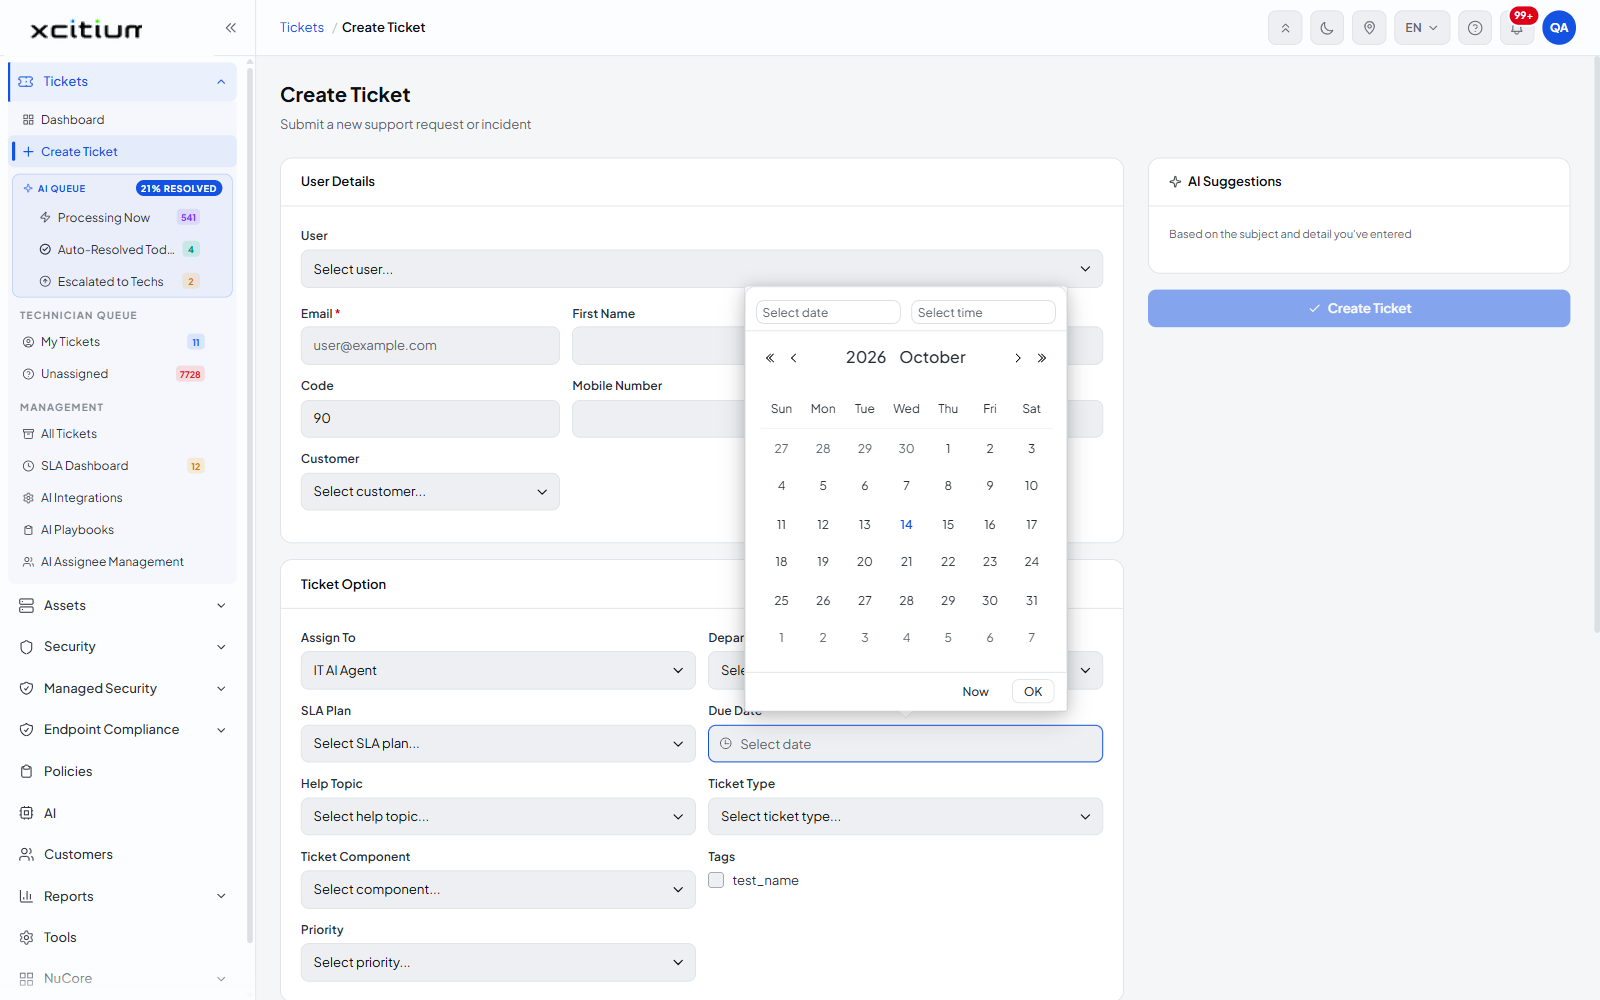
Set a due date
- Click the 'Due Date' field. A month calendar opens, headed with the year and month and laid out Sun to Sat.
- Use the arrows beside the month name to move to another month.
- Click the day you want. The date is written into the field.
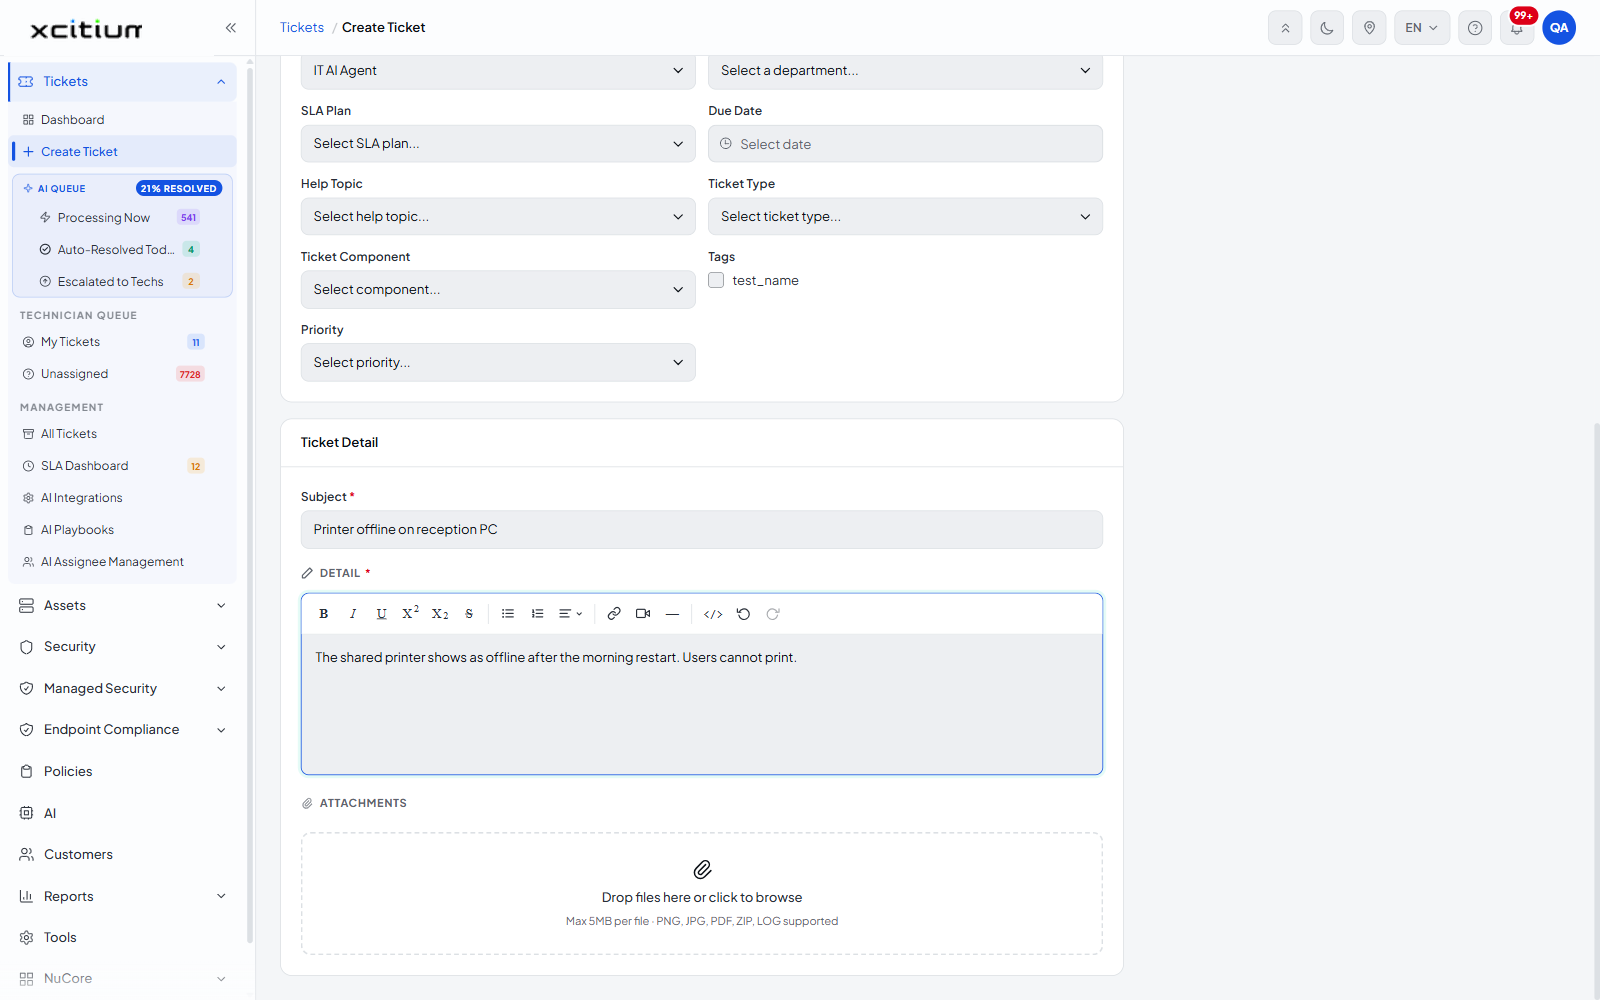
The Ticket Detail card
| Field | Type | Required |
| Subject | Text | Yes |
| Detail | Rich-text editor | Yes |
| Attachments | File drop zone | No |
The Detail editor toolbar
The 'Detail' editor carries a formatting toolbar:
| Button | Description |
| B | Bold. |
| I | Italic. |
| U | Underline. |
| X² | Superscript. |
| X₂ | Subscript. |
| S | Strikethrough. |
| Bullet list | Starts an unordered list. |
| Ordered list | Starts a numbered list. |
| Text alignment | Sets the alignment of the current paragraph. |
| Insert link | Turns the selection into a hyperlink. |
| Embed video | Embeds a video in the description. |
| — | Inserts a horizontal rule. |
| </> | Formats the selection as a code block. |
| Undo | Reverses the last edit. Disabled until you type something. |
| Redo | Reapplies the last undone edit. Disabled until you undo something. |
Attach a file
- Drag the file onto the 'Attachments' drop zone, or click the zone to open a file browser.
- Choose the file and confirm.
Note: each file must be 5 MB or smaller, and the supported types are PNG, JPG, PDF, ZIP and LOG.
The AI Suggestions panel
The panel on the right is headed 'AI Suggestions' with the line 'Based on the subject and detail you've entered'. As you fill in the subject and description it looks for similar tickets and knowledge-base articles. When it finds nothing it reads 'No similar tickets or KB articles found yet.'
Create a ticket
- Click 'Tickets' > 'Create Ticket'.
- In 'User Details', pick the reporter from the 'User' dropdown, or type their address into 'Email' and fill in the name and phone fields you need.
- Select the 'Customer' the ticket belongs to.
- In 'Ticket Option', set 'Assign To'. Leave it on 'IT AI Agent' to let the AI service agent work the ticket first, or pick a technician to send it straight to a person.
- Set 'Department', 'SLA Plan', 'Due Date', 'Help Topic', 'Ticket Type', 'Ticket Component' and 'Tags' as required.
- Choose a 'Priority'.
- In 'Ticket Detail', type the 'Subject' and write the 'Detail'.
- Add any attachments.
- Check the 'AI Suggestions' panel for an existing ticket or article that already covers the issue.
- Click 'Create Ticket'.
Note: the 'Create Ticket' button stays disabled until the required fields — 'Email', 'Subject' and 'Detail' — are filled in.
See Edit a Ticket for the matching screen used to change a ticket after it has been raised.